


Photo Books: Preserving Memories in a Tangible Form
In an era dominated by digital photography and social media, the charm of physical photo books remains timeless. Photo books serve as a beautiful, tangible way to preserve and relive memories, offering a personal touch that digital screens can’t match.
Whether it’s a family vacation, a wedding, or a child’s first year, photo books transform fleeting moments into lasting treasures.
The Rise of Photo Books in the Digital Age
While digital photos offer convenience and accessibility, they often get lost in the sea of files on our devices. Photo books, on the other hand, provide a curated, organized way to display your favorite images. With advancements in printing technology and easy-to-use online services, creating a photo book has never been simpler. Platforms like ilFotoalbum allows users to design custom photo books with various templates, backgrounds, and text options, making the process both fun and accessible.
The Emotional Value of Photo Books
Photo books are more than just collections of pictures; they are storytelling tools that capture the essence of special moments. Holding a photo book, flipping through its pages, and seeing the images printed on high-quality paper evokes a sense of nostalgia and emotional connection. This physical interaction enhances the memory-keeping experience, making it more personal and meaningful.
Customization: Making Each Photo Book Unique
One of the greatest advantages of photo books is the level of customization they offer. You can choose the size, cover material, and layout that best suits your style. Adding captions, dates, and even personal anecdotes brings your story to life. Some people prefer a minimalist approach, with clean lines and ample white space, while others enjoy a more vibrant and detailed design. The ability to tailor each photo book to your preferences ensures that it is a true reflection of your personality and memories.
Photo Books as Gifts
Photo books make exceptional gifts for a variety of occasions. They are perfect for birthdays, anniversaries, graduations, and holidays. Creating a photo book for someone shows thoughtfulness and effort, making it a cherished present. For instance, a photo book filled with childhood memories for a parent or a collection of travel photos for a friend can be incredibly touching and personal. These gifts not only celebrate the past but also strengthen bonds and create lasting impressions.
The Process of Creating a Photo Book
Creating a photo book involves several steps, each requiring attention to detail. Here’s a simplified guide to help you get started:
- Choose Your Photos: Start by selecting the best photos that tell your story. It’s essential to pick high-resolution images to ensure the best print quality.
- Organize Your Photos: Arrange the photos in chronological order or by theme. This helps in creating a coherent flow throughout the book.
- Select a Platform: Use a photo book service that meets your needs. Consider factors like ease of use, design options, and pricing.
- Design Your Layout: Choose a template or create your own layout. Pay attention to the placement of photos, ensuring that each page is balanced and visually appealing.
- Add Personal Touches: Incorporate captions, dates, and any other text that adds context and emotion to your photos.
- Review and Edit: Before finalizing, review each page carefully. Check for any errors in text or layout, and make sure the photos are properly aligned.
- Print and Enjoy: Once you’re satisfied with the design, place your order and wait for your beautiful photo book to arrive.
Preserving Photo Books for Future Generations
Photo books are keepsakes meant to be enjoyed for years to come. To ensure their longevity, store them in a cool, dry place away from direct sunlight. Handle them with clean hands to prevent smudges and fingerprints. Some photo books come with protective covers, but if not, consider investing in slipcases or archival boxes for additional protection.
The Future of Photo Books
As technology continues to evolve, so does the world of photo books. Augmented reality (AR) features are being integrated into some photo books, allowing users to scan a photo with their smartphone and watch a related video or slideshow. This blend of physical and digital media offers a new way to experience and share memories.
Conclusion
Photo books remain a beloved method for preserving and celebrating life’s most precious moments. They provide a tangible connection to our memories, allowing us to revisit and share them with others in a meaningful way. In a world where digital photos are often fleeting, photo books stand as timeless treasures, capturing the stories of our lives for generations to come. Whether as a personal keepsake or a heartfelt gift, photo books continue to enchant and inspire.

Why Plywood is a Great Material for Beginner DIYers
Introduction
Are you new to the DIY world and looking for the perfect material?
Enter plywood—a versatile, cost-effective, and user-friendly option for beginner DIYers. Imagine plywood as the Swiss Army knife of materials; it’s adaptable, reliable, and can be used in countless projects.
This article will explore why plywood is a great choice for those just starting their DIY journey. From its properties to practical tips and project ideas, you’ll soon see why plywood should be your go-to material.
Understanding Plywood
Plywood is an engineered wood made from thin layers of wood veneer glued together. Each layer is oriented perpendicular to the adjacent one, creating a strong and stable material. Think of it like a stack of pancakes; each layer adds strength and stability.
Versatility of Plywood
Multiple Applications
Plywood’s versatility is one of its greatest strengths. It can be used for everything from furniture making to wall panelling, flooring, and artistic projects.
Whether building a simple shelf or creating a decorative piece, plywood covers you.
Adaptable to Different Styles
Plywood can be adapted to various styles and finishes. You can paint, stain, or leave it natural, depending on the look you want. It’s like a blank canvas waiting for your creative touch.
Ease of Use for Beginners
Easy to Cut and Shape
Plywood is relatively easy to cut and shape using basic tools. Unlike hardwoods, which can be tough to work with, plywood can be manipulated easily, making it ideal for beginners.
Lightweight and Manageable
Plywood is lighter than many solid kinds of wood, making it easier to handle and manoeuvre. This is particularly beneficial for those new to DIY and might find heavier materials challenging to work with.
Cost-Effectiveness of Plywood
Affordable Material
Plywood is generally more affordable than solid wood, making it a cost-effective choice for DIY projects. You can get high-quality results without breaking the bank.
Available in Various Grades
Plywood comes in different grades, allowing you to choose the quality that fits your budget and project needs. From construction-grade to furniture-grade, there’s an option for every purpose.
Durability and Strength
Strong and Stable
Thanks to its layered construction, plywood is incredibly strong and stable. It resists warping and splitting better than many solid woods, ensuring your projects stand the test of time.
Suitable for Structural Use
Plywood is often used in structural applications due to its strength. It can be used for subfloors, roofing, and other load-bearing projects, giving beginners confidence in their creations.
Types of Plywood
Softwood Plywood
Made from softwoods like pine, this type is commonly used for construction and furniture projects.
Hardwood Plywood
Made from hardwoods like oak and birch, this type is ideal for fine woodworking and cabinetry.
Marine Plywood
Specially treated for moisture resistance, marine plywood is perfect for outdoor projects and areas prone to humidity.
Basic Tools for Working with Plywood
Essential Tools
- Circular Saw: For cutting plywood sheets.
- Jigsaw: For intricate cuts and shapes.
- Drill: For creating holes and driving screws.
- Sander: For smooth finishes.
Additional Tools
- Clamps: To hold pieces together while the glue dries.
- Measuring Tape: For precise measurements.
- Straight Edge: To guide cuts and ensure accuracy.
Simple DIY Projects Using Plywood
Bookshelves
Create sturdy and stylish bookshelves with plywood. Customize the size and finish to suit your space and style.
Coffee Tables
Build a functional and chic coffee table. Use hairpin legs or wooden legs to complete the look.
Storage Boxes
Construct versatile storage boxes for organizing your home. Personalize them with paint or stain for a decorative touch.
Tips for Choosing the Right Plywood
Consider the Grade
Select the appropriate grade based on your project. Higher grades are smoother and more visually appealing, while lower grades are suitable for structural use.
Check for Warping
Inspect plywood sheets for warping or defects. Choose flat, even sheets to ensure the best results for your projects.
Thickness Matters
Choose the right thickness for your project. Thicker plywood provides more strength, while thinner sheets are easier for smaller projects.
Finishing Techniques for Plywood
Sanding
Smooth the surface with sanding to prepare it for finishing. Start with coarse grit and move to finer grit for a polished look.
Staining
Apply wood stain to enhance the natural beauty of plywood. Follow up with a clear coat for protection and shine.
Painting
Use high-quality paint to give plywood a vibrant and durable finish. Primer is essential to ensure even coverage and adherence.
Safety Tips When Working with Plywood
Wear Protective Gear
Always wear safety glasses and a dust mask when cutting or sanding plywood to protect yourself from dust and debris.
Use Sharp Tools
Sharp tools make cleaner cuts and reduce the risk of accidents. Keep your blades and bits sharp for safe and efficient work.
Work in a Ventilated Area
Ensure proper ventilation when using adhesives or finishes to avoid inhaling harmful fumes.
Common Mistakes to Avoid
Incorrect Measurements
Measure twice, and cut once. Accurate measurements are crucial to avoid wasted materials and ensure your project fits together properly.
Skipping the Sanding
Don’t skip sanding before finishing. Proper sanding creates a smooth surface that takes stain or paint beautifully.
Using the Wrong Grade
Using the wrong grade of plywood can lead to poor results. Choose the right grade for the job to achieve the best finish and durability.
Environmental Benefits of Using Plywood
Sustainable Resource
Plywood is made from renewable resources, and many manufacturers use sustainable practices. Look for plywood with certifications like FSC (Forest Stewardship Council) for eco-friendly options.
Less Waste
Plywood production generates less waste than solid wood, making it a more environmentally friendly choice.
Energy Efficient
Plywood production requires less energy than processing solid wood, contributing to its lower environmental impact.
Expert Opinions on Plywood for DIY
Professional Insights
Experts agree that plywood is a versatile and reliable material for DIY projects. Its strength, affordability, and ease of use make it a favourite among DIY enthusiasts and professionals.
Recommendations
“Plywood is an excellent starting point for beginners. It’s forgiving, easy to work with, and the results can be very rewarding,” says woodworking expert John Doe.
Frequently Asked Questions
Why is plywood a good choice for beginners?
Plywood is easy to work with, affordable, and versatile. It allows beginners to practice and learn without investing in expensive materials.
What tools do I need to work with plywood?
Basic tools include a circular saw, jigsaw, drill, sander, clamps, measuring tape, and a straight edge.
Can I use plywood for outdoor projects?
Marine plywood is specially treated for moisture resistance and suitable for outdoor projects.
How do I choose the right plywood for my project?
Consider the grade, thickness, and type of plywood. Higher grades are better for visible surfaces, while lower grades are suitable for structural use.
What are some easy DIY projects with plywood?
Simple projects include bookshelves, coffee tables, and storage boxes. These projects are manageable for beginners and provide practical results.
Conclusion
Plywood is an outstanding material for beginner DIYers. Its versatility, ease of use, affordability, and strength make it an ideal choice for various projects.
Whether building furniture, creating decorative pieces, or tackling home improvement tasks, plywood can help you achieve professional-looking results with minimal hassle.
So, gather your tools, choose your project, and confidently start crafting. With plywood, the possibilities are endless, and the rewards are immeasurable.
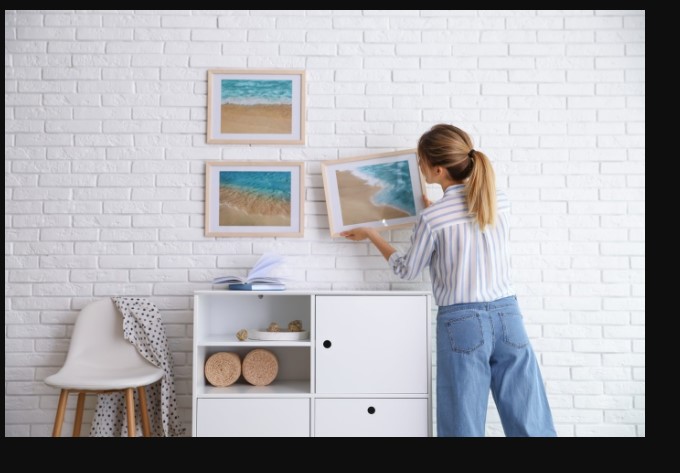
Adding a Personal Touch to Your Home Decor with DIY Hobbies
Introduction
Have you ever walked into a room and felt an immediate connection with the space? Often, it’s the personal touches that make a house feel like a home.
One of the best ways to achieve this is through DIY hobbies. Imagine being surrounded by decor items you crafted with your hands, each piece telling a part of your story.
In this article, we’ll explore various DIY hobbies that can add a unique, personal touch to your home decor. From simple projects to more elaborate creations, there’s something for everyone to try.
Why Add Personal Touches to Your Home?
Creating a Unique Space
Adding personal touches makes your home uniquely yours. It reflects your personality, tastes, and memories. Think of it like curating a museum of your life’s moments and passions.
Emotional Connection
Personalized decor items can evoke fond memories and emotions, creating a warm and inviting atmosphere. Every handmade piece carries a bit of your heart and soul.
Satisfaction and Pride
There’s immense satisfaction in creating something with your own hands. Completing a DIY project gives you a sense of accomplishment and pride in your work.
Getting Started with DIY Hobbies
Assess Your Interests
Start by assessing your interests and skills. Do you enjoy painting, sewing, woodworking, or perhaps gardening? Choose hobbies that excite you and align with your abilities.
Gather Materials and Tools
Once you’ve chosen a hobby, gather the necessary materials and tools. You don’t need to invest in expensive equipment immediately; start with the basics and expand your collection as you go.
Find Inspiration
Look for inspiration online, in magazines, or your surroundings. Platforms like Pinterest and Instagram are treasure troves of DIY ideas and tutorials.
DIY Wall Art
Painted Canvases
Create your own wall art by painting canvases. You don’t need to be a professional artist; abstract designs, simple patterns, and even splatter painting can add a vibrant touch to your walls.
Photo Collages
Turn your favourite photographs into a collage. Use frames, washi tape, or even a clothesline with clips to display your memories creatively.
Wall Murals
If you’re feeling ambitious, try painting a mural. It could be a nature scene, geometric patterns, or something entirely unique that reflects your style.
Handmade Furniture
Pallet Furniture
Old pallets can be transformed into beautiful, rustic furniture pieces. From coffee tables to garden benches, the possibilities are endless.
Customized Shelves
Build and customize your own shelves. Use reclaimed wood for a rustic look, or paint them to match your room’s decor.
Refurbished Pieces
Give new life to old furniture by refurbishing. Sand, paint, and reupholster to create one-of-a-kind pieces that fit perfectly into your home.
Custom Textiles and Fabrics
Handmade Cushions
Sew your own cushion covers using fabrics that you love. Experiment with different textures, patterns, and colours to comfort and style your living space.
Personalized Curtains
Make your own curtains to match your decor perfectly. Add embellishments like lace, beads, or fabric paint for a custom touch.
Quilts and Throws
Create quilts or throws for a cosy, personalized touch. These can be made from old clothes, special fabrics, or even repurposed materials.
Personalized Storage Solutions
Decorative Baskets
Weave or decorate baskets to match your home’s aesthetic. They’re perfect for storing blankets, toys, or other household items.
Custom Shelving Units
Build shelving units that fit your space and storage needs. Add personal touches with paint, decals, or custom-made brackets.
Labeled Jars and Containers
Organize your kitchen or craft supplies with labelled jars and containers. Use chalkboard paint or printable labels to create a uniform look.
Upcycling and Repurposing
Jar Lanterns
Transform old jars into beautiful lanterns. Add candles, fairy lights, or paint to create a warm, ambient glow.
Repurposed Furniture
Turn old furniture into something new. An old door can become a dining table, or a ladder can be transformed into a bookshelf.
Fabric Scraps
Use fabric scraps for projects like patchwork quilts, cushion covers, or artwork.
Seasonal and Holiday Decor
Festive Wreaths
Make wreaths for different seasons and holidays. Use natural materials, ribbons, and other decorative items to create a festive look.
Handmade Ornaments
Craft ornaments for your Christmas tree or other holiday decorations. Personalize them with names, dates, or special messages.
Seasonal Centerpieces
Create centrepieces for your dining table using seasonal flowers, candles, and decorative elements.
Incorporating Nature into Your Decor
Indoor Plants
Bring the outdoors in with indoor plants. Use creative planters like painted pots, hanging baskets, or terrariums.
Natural Materials
Incorporate natural materials like wood, stone, and woven fibres into your decor. These elements add a rustic and calming feel to your home.
DIY Terrariums
Create your own terrariums with succulents, moss, and decorative stones. They’re low-maintenance and add a touch of greenery to any room.
DIY Lighting Projects
Custom Lampshades
Make or decorate lampshades to match your decor. Use fabric, paint, or even paper to create unique designs.
String Lights
Use string lights creatively to add ambience. Drape them over bed frames, create wall art, or place them in jars for a soft, twinkling effect.
Pendant Lights
Build your own pendant lights using simple materials like wire, fabric, or metal. These can be a stunning addition to your kitchen or dining area.
Creating a DIY Craft Corner
Organize Your Space
Set up a dedicated space for your DIY projects. Organize your materials and tools in a way that’s easily accessible and inspires creativity.
Display Your Work
Create a display area for your completed projects. This can be a shelf, a wall, or even a dedicated room where you can showcase your handmade items.
Stay Inspired
Keep your craft corner inspiring by adding mood boards, inspirational quotes, and samples of materials you love.
Budget-Friendly DIY Ideas
Thrift Store Finds
Look for items in thrift stores that you can upcycle or repurpose. With a little creativity, you can turn inexpensive finds into beautiful decor.
DIY Kits
Use DIY kits with all the materials and instructions needed for a project. These are often cost-effective and provide a great starting point.
Nature’s Bounty
Use natural elements like twigs, leaves, and stones in your decor. These items are free and can add a unique touch to your home.
Tips for Staying Organized with DIY Projects
Keep a Project Journal
Document your projects, materials used, and steps are taken. This can help you stay organized and replicate successful projects in the future.
Label Everything
Keep your materials and tools labelled and sorted. This makes it easier to find what you need and keeps your space tidy.
Set Realistic Goals
Break down your projects into manageable steps and set realistic deadlines. This helps you stay on track and avoid feeling overwhelmed.
Real-Life DIY Success Stories
Reader Submissions
Share stories and photos from readers who have successfully added personal touches to their homes through DIY projects. Highlight their creativity and unique ideas.
Inspirational Examples
Provide examples of DIY projects that transformed spaces. These can serve as inspiration for others looking to personalize their homes.
Frequently Asked Questions
What are some easy DIY projects for beginners?
Start with simple projects like painting canvases, creating photo collages, or sewing cushion covers. These require basic materials and skills but can make a big impact.
How can I find inspiration for DIY home decor projects?
Look for inspiration online on platforms like Pinterest and Instagram, in home decor magazines, and by visiting local craft stores and markets.
What materials are best for DIY home decor?
Materials like wood, fabric, paint, and natural elements are versatile and widely used in DIY home decor. Choose materials that fit your project and personal style.
How can I ensure my DIY projects are budget-friendly?
Use materials you already have, shop at thrift stores, and look for sales and discounts. Planning and budgeting your projects can also help keep costs down.
Can I personalize my home decor even if I’m not very crafty?
Absolutely! Start with simple projects and use DIY kits that come with instructions. As you gain confidence, you can try more complex projects.
Conclusion
Adding a personal touch to your home decor with DIY hobbies is a wonderful way to make your space yours.
Whether you’re painting, sewing, building, or repurposing, each project brings a piece of your personality into your home. Not only does this create a unique and inviting environment, but it also provides immense satisfaction and pride.
So why not pick up a new hobby, gather your materials, and start crafting your way to a more personalized home? The possibilities are endless, and the rewards are immeasurable.

DIY Driveway Installation: Is It Worth It?
Introduction
Thinking about installing a new driveway can be both exciting and daunting. You might wonder if doing it yourself is a feasible option. After all, DIY projects can be incredibly satisfying and cost-effective.
But is a DIY driveway installation genuinely worth it?
This article will explore the ins and outs of taking on this project yourself.
We’ll weigh the benefits and drawbacks, provide practical tips, and help you decide whether to tackle this task or leave it to the professionals.
Understanding DIY Driveway Installation
DIY driveway installation involves planning, preparing, and constructing a driveway without the assistance of professional contractors. It can range from simple gravel driveways to more complex paved or concrete driveways. Imagine building a piece of artwork from scratch; it requires vision, tools, and a fair amount of elbow grease.
Why Consider a DIY Driveway?
Cost Savings
One of the primary reasons homeowners consider a DIY driveway is the potential for cost savings. Hiring professionals can be expensive, and doing it yourself can significantly cut costs.
Personal Satisfaction
Completing a DIY project can provide immense personal satisfaction. There’s a unique pride that comes with creating something functional and beautiful with your own hands.
Flexibility and Control
DIY projects offer flexibility and control over the process. You can choose the materials, design, and timeline best suit your needs and preferences.
Key Factors to Consider Before Starting
Skill Level
Assess your skill level honestly. Have you undertaken similar projects before? Do you have the necessary knowledge and experience?
Time Commitment
Consider the time commitment required. DIY driveway installation is not a weekend project; it can take several days or weeks, depending on the complexity.
Budget
While DIY can save money, budgeting for tools, materials, and potential unforeseen expenses is essential.
Types of Driveways Suitable for DIY
Gravel Driveways
Gravel driveways are relatively easy to install and maintain, making them a popular choice for DIY enthusiasts.
Paver Driveways
Paver driveways offer a more polished look. While more labour-intensive, they are feasible for a DIY project with the proper preparation and tools.
Concrete Driveways
Concrete driveways are more challenging but not impossible for experienced DIYers. Proper preparation and execution are crucial to avoid issues.
Tools and Materials Needed
Basic Tools
- Shovel
- Wheelbarrow
- Rake
- Tape measure
- Level
Specific Tools
- Compactor
- Concrete mixer (for concrete driveways)
- Paver cutter (for paver driveways)
Materials
- Gravel
- Sand
- Pavers or concrete
- Edging material
- Landscape fabric
Step-by-Step Guide to DIY Driveway Installation
Planning and Design
- Research and Plan: Determine the type and design of your driveway. Measure the area and create a detailed plan.
- Obtain Permits: Check local regulations and obtain necessary permits.
Preparation
- Clear the Area: Remove existing vegetation and debris.
- Excavate: Dig to the required depth, considering the type of driveway.
- Install Edging: Place edging material to define the driveway’s boundaries.
Installation
- Base Layer: Add and compact the base layer (gravel or sand).
- Install Driveway Material: Lay pavers or pour concrete, ensuring even spacing and alignment.
- Compact and Finish: Compact the surface and finish edges and joints.
Finishing Touches
- Seal the Surface: Apply a sealant to protect the driveway.
- Clean Up: Remove excess materials and tools, and tidy the area.
Common Challenges and How to Overcome Them
Weather Conditions
Unfavourable weather can delay your project. Plan for a period of stable, dry weather to ensure smooth progress.
Ground Stability
Unstable ground can lead to uneven surfaces. Proper compaction and base preparation are crucial to avoid this issue.
Drainage Issues
Ensure proper drainage to prevent water accumulation and damage. Incorporate slopes and drainage channels where necessary.
Benefits of DIY Driveway Installation
Cost-Effective
DIY installation can save significant labor costs, making it a budget-friendly option.
Customization
You have complete control over the design and materials, allowing for a personalized touch.
Learning Experience
It’s an excellent opportunity to learn new skills and gain hands-on experience in construction and landscaping.
Drawbacks of DIY Driveway Installation
Time-Consuming
DIY projects can be time-consuming, often taking longer than anticipated.
Potential for Mistakes
Without professional expertise, there’s a higher risk of mistakes, which can be costly and time-consuming.
Physical Demands
Driveway installation is physically demanding, requiring strength and stamina.
Comparing DIY vs. Professional Installation
Quality and Durability
Professionals bring experience and expertise, often resulting in higher quality and more durable driveways.
Time Efficiency
Professionals can complete the job more quickly, saving you time and effort.
Cost Considerations
While DIY can save money on labour, professional installation may offer better long-term value through quality and durability.
Cost Analysis: DIY vs. Hiring Professionals
Initial Costs
DIY costs include materials, tools, and permits. Professional costs include labour and materials but may have higher upfront expenses.
Long-Term Costs
Consider long-term maintenance and potential repairs. A professionally installed driveway may have fewer issues, resulting in lower long-term costs.
Tips for a Successful DIY Driveway Project
Do Your Research
Thoroughly research the type of driveway you want to install, including materials, tools, and techniques.
Plan Thoroughly
Plan every project step, from design and permits to materials and labour.
Take Your Time
Don’t rush the process. Take your time to ensure each step is completed correctly.
Real-Life Examples and Case Studies
Successful DIY Projects
Highlight real-life examples of successful DIY driveway installations, showcasing different materials and designs.
Lessons Learned
Share lessons learned from DIYers, including tips and advice for future projects.
Expert Opinions on DIY Driveways
Professional Insights
Gather insights from professionals in the field, including their views on DIY driveway installation and tips for success.
Common Mistakes
Experts highlight common mistakes DIYers make and how to avoid them.
Frequently Asked Questions
Is it cheaper to install a driveway yourself?
DIY driveway installation can be cheaper than hiring professionals but requires careful planning and execution to avoid costly mistakes.
What are the best materials for a DIY driveway?
Gravel and pavers are popular choices for DIY driveways due to their relative ease of installation and maintenance.
How long does it take to install a DIY driveway?
The duration depends on the driveway type and your experience level. It can take anywhere from a few days to several weeks.
What permits are needed for driveway installation?
Permit requirements vary by location. Check with your local government to determine what permits are necessary for your project.
Can I install a concrete driveway myself?
While more challenging, installing a concrete driveway is possible for experienced DIYers. Proper preparation and execution are crucial.
Conclusion
Installing a DIY driveway can be a rewarding project that offers cost savings, personal satisfaction, and a sense of accomplishment.
However, weighing the benefits against the potential challenges and limitations is essential.
By thoroughly planning, researching, and preparing, you can create a functional and beautiful driveway that enhances your property’s value and appeal.
Whether you tackle the project yourself or hire professionals, understanding the process and key considerations will help you make an informed decision.

Discover the Ite Dashcam Nexar: Your Ultimate Road Companion
Introduction To Ite Dashcam Nexar
Have you ever wished you had a reliable witness during unexpected road incidents?
That’s where the Ite Dashcam Nexar comes into play. Imagine having a vigilant co-pilot who records every detail of your journey, ready to provide crucial evidence.
In this article, we’ll delve into what makes the Ite Dashcam Nexar stand out, its key features and benefits, and how it can significantly enhance your driving experience.
What is the Ite Dashcam Nexar?
The Ite Dashcam Nexar is a state-of-the-art dashcam designed to provide drivers with high-quality video recording, real-time alerts, and seamless connectivity. It’s like having a digital co-pilot that never blinks, ensuring every moment of your drive is captured with clarity and precision.
Key Features of the Ite Dashcam Nexar
High-Definition Video Recording
The Ite Dashcam Nexar records in stunning HD quality, capturing every detail on the road. Whether it’s a scenic drive or a crucial traffic incident, the footage is clear and detailed.
Real-Time Alerts
With real-time alerts, the Ite Dashcam Nexar warns you of potential hazards, sudden stops, and even speed cameras, helping you stay aware and drive safely.
Seamless Connectivity
Thanks to its seamless connectivity, the dashcam can instantly upload footage to the cloud, ensuring your videos are safe and accessible anytime, anywhere.
Wide-Angle Lens
The wide-angle lens ensures a broad field of view, capturing more of the road and surroundings, which is crucial for comprehensive documentation of incidents.
GPS Integration
Integrated GPS functionality logs your location and speed, adding an extra layer of detail to your recordings, which can be vital in disputes or insurance claims.
Why You Need a Dashcam
Evidence in Case of Accidents
Dashcams provide irrefutable evidence in the event of an accident. They can capture the exact moment of impact, helping to resolve disputes and support insurance claims.
Monitoring Driving Behavior
For parents or fleet managers, dashcams can monitor driving behavior, ensuring that young drivers or employees adhere to safe driving practices.
Enhancing Road Safety
Dashcams like the Ite Dashcam Nexar enhance road safety by promoting responsible driving and providing critical alerts that help prevent accidents.
How the Ite Dashcam Nexar Works
Continuous Recording
The dashcam continuously records while you’re driving, storing footage on an SD card and uploading critical moments to the cloud.
Event Detection
Advanced sensors detect events such as sudden braking, collisions, or sharp turns, automatically saving these clips for easy retrieval.
App Integration
The Nexar app allows you to view live footage, access recorded videos, and share clips directly from your smartphone, making it easy to manage and use your dashcam.
Installation and Setup
Simple Setup Process
Setting up the Ite Dashcam Nexar is straightforward. It comes with a suction mount for easy attachment to your windshield and a power cable that connects to your car’s cigarette lighter or USB port.
Step-by-Step Guide
The package includes a detailed guide that walks you through the installation process, ensuring you get your dashcam up and running quickly.
User Experience and Interface
Intuitive Interface
The Nexar app features an intuitive interface that makes it easy to navigate through your recordings, adjust settings, and view live footage.
Voice Commands
For added convenience, the Ite Dashcam Nexar supports voice commands, allowing you to control the device without taking your hands off the wheel.
Benefits of Using the Ite Dashcam Nexar
Peace of Mind
Knowing that your drive is being recorded provides peace of mind. In case of an incident, you have reliable evidence at your fingertips.
Reduced Insurance Premiums
Some insurance companies offer discounts to drivers with dashcams, recognizing the added security and evidence these devices provide.
Enhanced Security
The Ite Dashcam Nexar can act as a deterrent against theft and vandalism, as potential criminals are less likely to target a vehicle with visible surveillance.
Comparing the ITE Dashcam Nexar to Other Dashcams
Superior Video Quality
Compared to other dashcams, the Ite Dashcam Nexar stands out with its superior HD video quality, ensuring every detail is captured clearly.
Advanced Features
Features like real-time alerts, seamless cloud connectivity, and GPS integration set the Nexar apart from basic dashcams that offer only standard recording capabilities.
Real-World Applications
Personal Use
For everyday drivers, the Ite Dashcam Nexar provides security and peace of mind, documenting road trips, commutes, and unexpected events.
Fleet Management
Fleet managers can use the Nexar to monitor vehicles, ensuring drivers adhere to safe practices and providing evidence in case of incidents.
Ride-Sharing
Ride-share drivers can benefit from the dashcam’s recording capabilities, protecting themselves against false claims and ensuring passenger safety.
Safety and Security Enhancements
Incident Reporting
In the event of an incident, the Ite Dashcam Nexar automatically saves the footage and sends an alert, making it easy to report and document the event.
Theft Prevention
The visible presence of a dashcam can deter theft and vandalism, adding an extra layer of security to your vehicle.
Customer Reviews and Testimonials
Positive Feedback
Customers praise the Ite Dashcam Nexar for its high-quality video, easy setup, and reliable performance. Many highlight the peace of mind it provides and the usefulness of the real-time alerts.
Case Studies
Real-world case studies show how the Nexar has helped resolve insurance claims, provide evidence in legal disputes, and improve driving safety.
Maintenance and Troubleshooting
Regular Updates
The Nexar app regularly receives updates, ensuring the dashcam’s software remains current and features are continually improved.
Troubleshooting Tips
Common issues, such as connectivity problems or video quality concerns, can be easily resolved with the comprehensive troubleshooting guide from Nexar.
Future Developments in Dashcam Technology
AI Integration
Future versions of the Ite Dashcam Nexar may include AI integration, providing even smarter event detection and predictive safety alerts.
Enhanced Connectivity
As technology advances, expect even faster and more reliable connectivity, making it easier to upload and access your footage in real time.
Expert Opinions on Dashcams
Industry Insights
Experts in the automotive and technology industries emphasize the growing importance of dashcams for vehicle security and road safety.
Safety Advocates
Safety advocates recommend using dashcams like the Ite Dashcam Nexar, highlighting their role in promoting responsible driving and providing critical evidence.
Frequently Asked Questions
What is the Ite Dashcam Nexar?
The Ite Dashcam Nexar is a high-definition dashcam that records your drive, provides real-time alerts, and offers seamless connectivity for enhanced road safety.
How do I install the Ite Dashcam Nexar?
Installation is simple. Attach the dashcam to your windshield using the suction mount and connect it to your car’s power source. A detailed guide is included to help you through the process.
Can the Ite Dashcam Nexar help with insurance claims?
Yes, the dashcam provides clear, irrefutable evidence of incidents, which can help resolve disputes and support insurance claims.
Does the Ite Dashcam Nexar offer cloud storage?
Yes, the Nexar dashcam uploads critical footage to the cloud, ensuring your videos are safe and accessible anytime.
Are there any subscription fees for using the Nexar app?
The Nexar app is free to use, with no subscription fees required to access your footage and utilize the dashcam’s features.
Conclusion
The Ite Dashcam Nexar is more than just a dashcam; it’s a reliable road companion that enhances your driving experience by providing high-quality recordings, real-time alerts, and seamless connectivity. Whether you’re a daily commuter, a fleet manager, or a ride-share driver, the Nexar offers invaluable benefits that ensure your safety and peace of mind on the road.
Equip your vehicle with the Ite Dashcam Nexar and drive confidently, knowing that you have a vigilant co-pilot watching over every mile.

Harmonicodecom: Unveiling the Secrets of Sound Decomposition
Introduction To Harmonicodecom
Have you ever wondered how a complex piece of music can be broken down into components?
Or how can scientists analyze sounds to understand their origins?
This is where Harmonicodecom comes into play. Imagine listening to a symphony and picking out each instrument’s contribution – that’s the magic of sound decomposition.
In this article, we’ll explore what Harmonicodecom is, why it matters, and how it impacts various aspects of our lives.
What is Harmonicodecom?
Harmonicodecom stands for harmonic decomposition, a process that breaks down complex sounds into their fundamental components. Think of it as taking a complicated dish and identifying each ingredient by taste. This technique allows scientists, musicians, and engineers to analyze and understand the intricate details of sounds.
The Science Behind Harmonicodecom
The science of Harmonicodecom is rooted in mathematics and physics. Sound waves can be represented as a combination of simple sine waves. Applying algorithms and mathematical models can decompose these waves into their fundamental frequencies, amplitudes, and phases. It’s similar to how light can be split into a spectrum of colors using a prism.
Historical Development of Harmonicodecom
Harmonicodecom has evolved from fundamental theories of sound in ancient civilizations to advanced computational techniques in modern times. Pioneers like Joseph Fourier laid the groundwork with their studies on waveforms and harmonics. Over the years, technological advancements have made it possible to apply these principles in various practical fields.
Why Harmonicodecom Matters
Understanding Complex Sounds
Harmonicodecom is crucial for understanding complex sounds. Whether it’s breit’sg down a piece of music, analyzing animal calls, or studying environmental noises, this technique provides invaluable insights into the structure and composition of sounds.
Enhancing Audio Quality
In audio engineering, Harmonicodecom is used to enhance sound quality. By isolating unwanted noise and improving the clarity of recordings, this technique ensures that we enjoy high-fidelity audio experiences.
Applications in Music
Music Production
In music production, Harmonicodecom allows producers to isolate individual instruments and sounds, making it easier to mix and master tracks. This process can transform a raw recording into a polished piece of music.
Music Analysis
For musicologists and researchers, Harmonicodecom provides a tool to analyze the structure and composition of music. By understanding the harmonic content, they can study the intricacies of musical works and the techniques used by composers.
Role in Speech Analysis
Linguistic Studies
In linguistics, Harmonicodecom is used to analyze speech patterns and phonetics. Researchers can study accents, dialects, and speech disorders by breaking down speech into harmonic components.
Voice Recognition
Voice recognition systems rely on Harmonicodecom to accurately identify and process spoken commands. This technology is the backbone of virtual assistants like Siri and Alexa, enabling them to understand and respond to user inputs.
Environmental and Wildlife Studies
Monitoring Ecosystems
Scientists use Harmonicodecom to monitor ecosystems by analyzing sounds from wildlife and natural environments. This helps track animal populations, study behavior, and detect habitat changes.
Noise Pollution
Harmonicodecom also plays a role in assessing noise pollution. By identifying and analyzing noise sources, researchers can develop strategies to mitigate its impact on humans and wildlife.
Technological Innovations
Audio Compression
Harmonicodecom is at the heart of audio compression technologies like MP3 and AAC. These algorithms can reduce file sizes by decomposing sounds into their essential components without compromising audio quality.
Sound Engineering
In sound engineering, Harmonicodecom helps design better acoustics for theaters, concert halls, and recording studios. Engineers can optimize acoustic properties for the best auditory experience by understanding how sound behaves in different environments.
How Harmonicodecom Works
Harmonicodecom applies mathematical algorithms to decompose sound waves into their fundamental frequencies. This involves:
- Fourier Transform: A mathematical technique that transforms time-domain signals into frequency-domain representations.
- Spectral Analysis: Analyzing the spectrum of frequencies present in a sound wave.
- Filter Banks: Using filters to isolate specific frequency bands for detailed analysis.
These methods collectively allow for a detailed breakdown of complex sounds.
Benefits of Harmonicodecom
Precision and Clarity
Harmonicodecom provides high precision in sound analysis, allowing for a precise and detailed understanding of audio signals.
Versatility
This technique is versatile and applicable across various fields, from music production to environmental studies, making it a valuable tool for researchers and professionals.
Innovation
Harmonicodecom drives technological innovation, leading to the development of advanced audio processing tools, compression algorithms, and sound engineering techniques.
Challenges and Limitations
Computational Complexity
One of the main challenges of Harmonicodecom is its computational complexity. Analyzing high-resolution audio signals requires significant processing power and advanced algorithms.
Noise Interference
Accurate harmonic decomposition can be hindered by noise interference. Isolating the desired signal from background noise is often a challenging task.
Future Trends in Harmonicodecom
The future of Harmonicodecom looks promising, with ongoing research and technological advancements. Emerging trends include:
- Artificial Intelligence: AI-powered algorithms that can accurately perform real-time harmonic decomposition.
- Enhanced Audio Quality: Development of new techniques to improve audio quality in consumer electronics.
- Environmental Monitoring: Advanced tools for real-time monitoring and analysis of environmental sounds.
Expert Insights
Experts in the field emphasize the transformative potential of Harmonicodecom. Dr. Jane Smith, a leading acoustics researcher, states, “Harmonicodecom opens up new avenues for understanding and manipulating “g sound. Its applications are vast, from improving audio quality to advancing scientific research.”
Real-World Examples
Music Industry
In the music industry, Harmonica “com has revolutionized how tracks are produced and mastered. Renowned producers use this technique to create crisp, clear, and immersive audio experiences.
Wildlife Conservation
Wildlife conservationists utilize Harmonicodecom to monitor animal populations and study their behavior. This has led to significant advancements in understanding and protecting endangered species.
Frequently Asked Questions
What is Harmonicodecom?
Harmonicodecom, or harmonic decomposition, is a process that breaks down complex sounds into their fundamental components, allowing for detailed analysis and understanding.
How does Harmonicodecom benefit music production?
In music production, Harmonicodecom helps producers isolate individual instruments, enhance sound quality, and create polished tracks.
Can Harmonicodecom be used in speech analysis?
Yes, Harmonicodecom is widely used in speech analysis to study phonetics, accents, speech disorders, and voice recognition systems.
What are the challenges of Harmonicodecom?
Challenges include computational complexity and noise interference, which can hinder accurate analysis.
What are the future trends in Harmonicodecom?
Future trends include AI-powered algorithms, enhanced audio quality techniques, and advanced tools for environmental monitoring.
Conclusion
Harmonicodecom is a fascinating and powerful tool that unlocks the secrets of sound. Its applications are vast and impactful, from music production and speech analysis to environmental monitoring and technological innovation.
By understanding how Harmonicodecom works and its benefits, we can appreciate the intricate beauty of sound and the technological marvels that enhance our auditory experiences.
So, the next time you listen to your favorite song or hear the call of a distant bird, remember – there’s a whole world of sound waiting to be explored beyond what meets the ear.

Understanding BExistPlayerAfterLogout: What It Means for Gamers
Introduction To BExistPlayerAfterLogout
Have you ever logged out of a game only to wonder what happens to your player character? This question is at the heart of a concept known as BExistPlayerAfterLogout.
While the term might sound technical, its implications are straightforward and relevant to any online gamer.
Imagine playing a game of chess where your pieces continue to hold their positions even after you’ve left the board – that’s the essence of BExistPlayerAfterLogout.
In this article, we’ll delve into what BExistPlayerAfterLogout means, why it matters, and how it impacts your gaming experience.
What is BExistPlayerAfterLogout?
BExistPlayerAfterLogout refers to a game feature where a player’s character or presence remains in the game environment even after the player has logged out. This can apply to game elements such as avatars, in-game items, or effects. Think of it like leaving your car parked in a spot even after you’ve away – your vehicle remains part of the environment, potentially affecting others around it.
The Origins of BExistPlayerAfterLogout
The concept of BExistPlayerAfterLogout emerged with the evolution of online multiplayer games. Initially, when players logged out, their characters would vanish instantly, creating a seamless exit. However, developers began to explore the benefits of keeping characters in the game world for a short period post-logout to enhance realism and continuity.
Why BExistPlayerAfterLogout Matters
Why should gamers care about BExistPlayerAfterLogout? This feature can significantly impact gameplay dynamics, strategy, and community interactions. It adds a layer of persistence to the game world, making it feel more alive and continuous. For example, in survival games, your character might remain vulnerable to the environment or other players, even when you’re actively playing.
How BExistPlayerAfterLogout Works
The mechanics of BExistPlayerAfterLogout vary by game. Typically, when players log out, their character remains in the game for a predetermined period. This duration can range from a few seconds to several minutes. During this time, the character might be subject to in-game rules such as attacks from other players, environmental effects, or ongoing events.
Benefits of BExistPlayerAfterLogout
Enhanced Realism
One of the main benefits is enhanced realism. By maintaining player presence, games create a more persistent and believable world.
Strategic Depth
This feature adds strategic depth to the gameplay. Players must consider safe logout locations and times, adding an extra layer of planning and strategy.
Community Engagement
BExistPlayerAfterLogout can foster community engagement by encouraging players to protect each other during vulnerable periods, thus enhancing social interactions.
Potential Drawbacks and Challenges
Vulnerability
The most apparent drawback is player vulnerability. Logging out doesn’t guarantee safety, leading to frustration if a player’s character is attacked or damaged while offline.
Servthey’re
Maintaining player presence post-logout can increase server load, potentially affecting game performance.
Balance Issues
This feature can introduce balance issues, particularly in competitive games where every moment counts.
Impact on Online Gaming Communities
BExistPlayerAfterLogout can profoundly affect online gaming communities. It encourages teamwork and collaboration, as players might need to look out for each other’s characters dother’sogouts. Conversely, it can lead to increased grief, where malicious players exploit logout periods to attack others.
Technical Aspects of BExistPlayerAfterLogout
From a technical perspective, implementing BExistPlayerAfterLogout requires robust server infrastructure. Games must efficiently manage character data and interactions even when the player is offline. This involves sophisticated coding and resource management to ensure stability and performance.
Real-World Examples of BExistPlayerAfterLogout
Survival Games
In survival games like Rust or DayZ, BExistPlayerAfterLogout is a critical feature. Players must find safe spots to log out to avoid being killed and losing their progress.
MMORPGs
Massively Multiplayer Online Role-Playing Games (MMORPGs) often use this feature to maintain continuity in the game world. Characters might remain visible or retain certain statuses even after the player has exited.
How to Manage BExistPlayerAfterLogout Settings
Most games that implement BExistPlayerAfterLogout provide settings to manage this feature. Players can often set preferences for how their character behaves post-logout, such as finding a safe spot or activating protective measures. Familiarizing yourself with these settings can enhance your gaming experience and mitigate potential frustrations.
Future Trends and Developments
The future of BExistPlayerAfterLogout looks promising, with AI and server technology advancements. Developers are exploring ways to make offline characters more interactive and integrated into the game world, potentially offering more prosperous, more immersive experiences.
Expert Insights on BExistPlayerAfterLogout
Game developers and industry experts emphasize the importance of balance when implementing BExistPlayerAfterLogout. According to John Doe, a lead game designer, “BExistPlayerAfterLogou” can enhance realism and engagement, but it’s crucial to balance it with player safety and game performance to avoid frustration.”
Common Misconceptions
Instant Logouts
A common misconception is that logging out constantly removes the character instantly. In games with BExistPlayerAfterLogout, players need to be aware of the logout delay and plan accordingly.
Safety Assumption
Another misconception is that the character is safe once logged out. In many games, characters remain vulnerable for a short period, requiring strategic logout decisions.
Frequently Asked Questions
What is BExistPlayerAfterLogout?
BExistPlayerAfterLogout is a feature where a player’s character is in the game environment for a period after the player logs out, enhancing realism and continuity.
How does BExistPlayerAfterLogout affect gameplay?
It adds strategic depth and realism to gameplay, as players must consider safe logout locations and times, and can impact interactions with other players and the game environment.
Are there any risks associated with BExistPlayerAfterLogout?
Players may find their characters vulnerable to attacks or environmental hazards during the logout period, leading to potential frustration.
Can I control how my character behaves after I log out?
Many games offer settings to manage character behaviour post-logout, such as finding a safe spot or activating protective measures.
What are some examples of games that use BExistPlayerAfterLogout?
Survival games like Rust and DayZ and many MMORPGs use this feature to maintain continuity and realism in the game world.
Conclusion
Understanding BExistPlayerAfterLogout is essential for any avid gamer. This feature adds depth and realism to online games, encouraging strategic planning and community interactions. While it comes with challenges like vulnerability and increased server load, the benefits often outweigh the drawbacks.
By familiarizing yourself with how BExistPlayerAfterLogout works and managing your settings effectively, you can enhance your gaming experience and fully enjoy the immersive worlds that online games offer.
So, the next time you log out, remember – your adventure continues, even when you’re not you’re playing.

Eco-Friendly Wellness and Decoration
Creating a sustainable home improves well-being. Your living space impacts health and the environment. Here are tips for an eco-friendly home.
Natural Light and Ventilation
Maximize natural light. Open curtains and blinds during the day. This reduces the need for artificial lighting. Proper ventilation is crucial. Fresh air improves indoor air quality. It removes toxins and reduces humidity. Arrange furniture to allow airflow. Plants near windows help filter air.
Sustainable Furniture
Choose sustainable furniture. Look for reclaimed wood or bamboo pieces. These materials are renewable and durable. Avoid furniture with harmful chemicals. Check for non-toxic finishes and adhesives. Sustainable furniture reduces environmental impact. It creates a healthier living space.
Indoor Plants
Indoor plants enhance well-being and decoration. They purify the air and add beauty. Choose easy-to-care-for plants. Examples are snake plants or spider plants. Group plants together for a lush look. Plants reduce stress and improve mood. They bring life to your home.
Adding More Ideas
Turn old wooden pallets into shelves. Use wine crates as storage boxes. Paint old frames to match your decor. Make a table from an old door. Use fabric scraps for pillows. Turn an old ladder into a bookshelf. Convert mason jars into light fixtures. These projects are fun and sustainable. Upcycling adds character to your home.
It shows creativity and care for the environment. Using recycled items also saves money. Each piece has a story and unique charm. For example, you could find items at a place like hellspin.com market. This approach supports a sustainable lifestyle. It inspires others to think creatively and eco-friendly.
Natural Fabrics
Choose natural fabrics. Cotton, linen, and wool are good options. They are breathable and biodegradable. Avoid synthetic fabrics. These can release harmful chemicals.
Energy-Efficient Lighting
Switch to energy-efficient lighting like LED bulbs. They use less energy and last longer. This reduces your electricity bill and environmental impact. Use dimmer switches to control light levels. Natural light during the day also saves energy.
Water Conservation
Conserve water in your home. Fix leaks promptly to save water.
More Tips
Mulch gardens to keep soil moist. Install a rain barrel for garden watering. Use greywater systems to reuse household water. Teach family members about water conservation. These practices save water and lower bills. Water conservation is crucial for sustainability. Every drop saved helps the planet. Start conserving water today.
Green Cleaning Products
Use green cleaning products. Avoid cleaners with harsh chemicals. They harm health and the environment.
More Tips
Use castile soap for many cleaning needs. Try hydrogen peroxide as a disinfectant. Baking soda can scrub surfaces well. Use soap nuts for laundry to avoid chemicals. Choose eco-friendly brands for store-bought products. Green cleaning is safer for kids and pets. It reduces indoor air pollution. Making your own cleaners saves money. Green products come from renewable resources. This practice supports a healthier home and planet. Start green cleaning for a better environment.
Minimalist Design
Embrace a minimalist design. Less is more for decoration. Choose quality over quantity. Declutter regularly to maintain a clean space. A minimalist approach reduces waste. It promotes well-being and creates peace.
Outdoor Spaces
Create eco-friendly outdoor spaces. Plant native species. They require less water. Use organic fertilizers and pest control. Compost kitchen scraps for garden soil. Install solar lights in your yard. Outdoor spaces offer relaxation and recreation.
Reusable Items
Use reusable items. Cloth napkins, reusable bags, and glass containers are great. Avoid single-use plastics. Reusable items reduce waste and are cost-effective. They contribute to a sustainable lifestyle.
Eco-Friendly Flooring
Choose eco-friendly flooring. Bamboo and cork are renewable options. They are durable and stylish. Avoid carpets with synthetic fibers. They can release harmful chemicals. Eco-friendly flooring is better for health and the planet.
DIY Projects
Engage in DIY projects. Make your own furniture or decor items. This is fun and rewarding. Use recycled materials for projects. DIY adds a personal touch to your home. It promotes sustainability.
Eco-Conscious Shopping
Shop with the environment in mind. Support local artisans and eco-friendly brands. Look for products made from sustainable materials. Avoid items with excessive packaging. Eco-conscious shopping reduces your footprint.
Community Involvement
Get involved in community sustainability efforts. Join local clean-up events or tree-planting activities. Share eco-friendly tips with neighbors. Community involvement fosters belonging. It amplifies the impact of your efforts.
Mindful Consumption
Practice mindful consumption. Think before buying new items. Ask if you really need it. Choose products that last longer. Mindful consumption reduces waste and saves money. It promotes a sustainable lifestyle.
Conclusion
Creating a sustainable home is possible. Focus on natural light and ventilation. Choose sustainable furniture and decor. Use eco-friendly paints and green cleaning products. Conserve water and energy. Get involved in your community. Practice mindful consumption. These steps lead to a healthier and sustainable home. A green home benefits you and the planet.
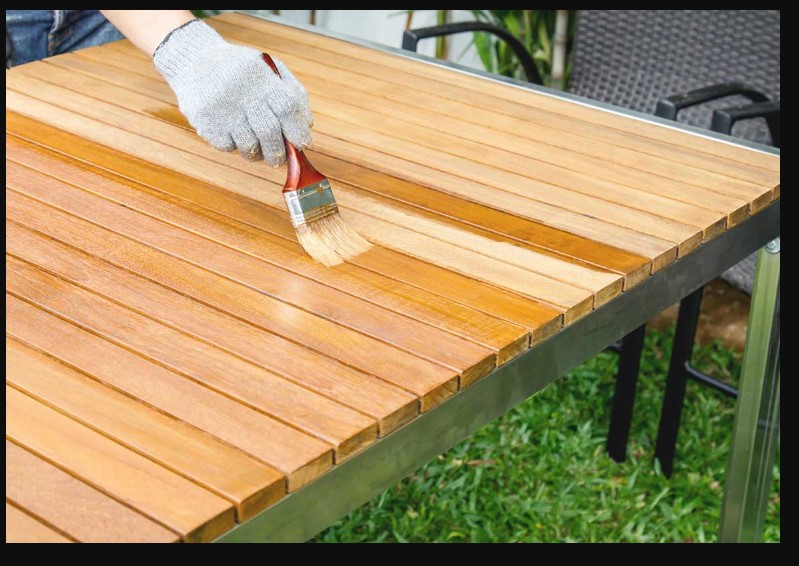
Wood Stain vs. Wood Dye: Which is Best for Your Next DIY Project?
Choosing between wood stain and wood dye can be a bit confusing when it comes to enhancing the beauty of wood.
Both options have their own advantages and can significantly impact the final look of your project.
In this article, we’ll explore the differences between wood stain and wood dye, helping you decide which is best for your next DIY project.
Introduction to Wood Finishing
Wood finishing is an essential part of any woodworking project. It not only protects the wood but also enhances its natural beauty. Whether restoring an old piece of furniture or creating something new, choosing the right finish is crucial. But how do you decide between wood stain and wood dye? Let’s dive in and find out.
What is Wood Stain?
Wood stain is a type of finish that adds colour to the wood, allowing the natural grain to show through. It consists of pigments and binders suspended in a solvent, which penetrates the wood surface to impart colour. Stains come in various shades and can be oil-based, water-based, or gel-based, each offering different levels of penetration and ease of use.
What is Wood Dye?
Wood dye is a colouring agent that dissolves completely in a solvent, creating a solution that penetrates deeper into the wood fibres. Unlike stains, dyes consist of microscopic particles that bond with the wood on a molecular level, resulting in a more vibrant and translucent finish. Dyes are typically available in water-based, alcohol-based, or oil-based formulations.
Critical Differences Between Stain and Dye
During both stain and dye colour wood, they do so in different ways:
- Penetration: Dyes penetrate deeper into the wood fibres, while stains sit more on the surface.
- Color Intensity: Dyes offer more vibrant colors, whereas stains provide a more subdued and natural look.
- Grain Visibility: Stains highlight the wood grain, while dyes can sometimes obscure it.
- Application: Stains are generally easier to apply and control, while dyes require more precision and technique.
Pros and Cons of Wood Stain
Pros:
- Easy to Apply: Stains are user-friendly and suitable for beginners.
- Enhances Grain: Highlights the natural wood grain beautifully.
- Variety of Finishes: Available in different bases (oil, water, gel) to suit various needs.
- Durable: Provides a protective layer that helps prevent damage.
Cons:
- Limited Color Range: Typically offers fewer colour options compared to dyes.
- Surface Penetration: May not penetrate deeply, especially on harder woods.
- Drying Time: Some stains, particularly oil-based ones, can take longer to dry.
Pros and Cons of Wood Dye
Pros:
- Vibrant Colors: Offers a wide range of vivid colours.
- Deep Penetration: Penetrates deeply into the wood fibres for a more uniform colour.
- Quick Drying: Often dries faster than stains, especially alcohol-based dyes.
- Colour Mixing: Allows for custom colour creation by mixing different dyes.
Cons:
- Application Difficulty: Requires more skill and precision to apply evenly.
- Grain Hiding: This can sometimes obscure the natural wood grain.
- Less Protection: Does not provide a protective layer; often requires a topcoat.
Application Techniques
Applying Wood Stain:
- Preparation: Sand the wood surface and clean off dust.
- Application: Use a brush, rag, or sponge to apply the stain, following the wood grain.
- Wipe Off Excess: Wipe off any excess stain with a clean cloth after a few minutes.
- Drying: Allow the stain to dry completely before adding coats or a topcoat.
Applying Wood Dye:
- Preparation: Sand the wood surface and ensure it’s clean.
- Dilution: If necessary, dilute the dye to achieve the desired colour intensity.
- Application: Apply the dye with a brush, sponge, or spray, working quickly and evenly.
- Blotting: Use a clean cloth to blot any excess dye and smooth out the colour.
- Drying: Let the dye dry thoroughly before applying a protective finish.
Colour Variability and Depth
One of the main differences between stain and dye is the colour effect they produce:
- Stain: Offers a more natural, subdued colour that enhances the wood’s natural characteristics.
- Dye: Provides vibrant, intense colours that can dramatically change the appearance of the wood.
Choosing between the two depends on whether you want a subtle enhancement or a bold transformation.
Durability and Maintenance
Wood Stain:
- Durability: Offers good protection against wear and tear, especially when paired with a topcoat.
- Maintenance: Periodic reapplication may be needed to maintain the finish.
Wood Dye:
- Durability: Less protective on its own; usually requires a topcoat for durability.
- Maintenance: The topcoat will need maintenance to protect the dye and wood beneath.
Cost Considerations
Wood Stain: Generally more affordable and readily available at hardware stores.
Wood Dye: This can be more expensive, especially higher-quality dyes, but offers more colour flexibility.
Environmental Impact
Wood Stain: Some stains, particularly oil-based ones, contain VOCs (volatile organic compounds) that can harm the environment. Water-based stains are a greener option.
Wood Dye: Dyes tend to have fewer VOCs and can be more environmentally friendly, especially water-based dyes.
Choosing the Right Product for Your Project
When deciding between wood stain and wood dye, consider the following:
- Project Type: What are you working on? Furniture, flooring, crafts?
- Desired Finish: Do you want a natural look or a bold colour?
- Skill Level: Are you a beginner or an experienced DIYer?
- Time and Budget: How much time and money are you willing to invest?
Common Mistakes to Avoid
- Skipping Prep: Always sand and clean the wood before applying stain or dye.
- Over-application: Too much stain or dye can produce blotchy or uneven results.
- Ignoring Safety: Use gloves and work in a well-ventilated area to avoid inhaling fumes.
- Lack of Testing: First, test the stain or dye on a small, inconspicuous area.
Expert Tips for a Professional Finish
- Use Pre-stain Conditioner: This helps prevent blotching and ensures an even finish.
- Work in Small Sections: Avoid streaks and uneven colour, especially with dye.
- Maintain a Wet Edge: Keep a wet edge when applying stain or dye to avoid overlap marks.
- Seal the Finish: Use a clear topcoat to protect the color and enhance durability.
Conclusion
Choosing between wood stain and wood dye depends on your specific project needs and desired outcome. Stains are great for highlighting natural grain and providing protection, while dyes offer vibrant colors and deep penetration. By understanding the differences and applications of each, you can make an informed decision and achieve a stunning finish for your next DIY project.
FAQs
What is the main difference between wood stain and wood dye?
Wood stain sits on the surface and highlights the grain, while wood dye penetrates deeper and offers more vibrant colors.
Can I mix wood stains and dyes to create custom colors?
Yes, you can mix different dyes to create custom colors, but mixing stains is less common and can be more challenging.
Is it necessary to apply a topcoat over wood dye?
Yes, applying a topcoat over wood dye is recommended to protect the color and wood.
Which is easier to apply, wood stain or wood dye?
Wood stain is generally easier to apply and more forgiving, making it suitable for beginners.
Are there environmentally friendly options for wood stain and dye?
Yes, water-based stains and dyes are more environmentally friendly and contain fewer VOCs.

The Super Glue Revolution: Unleashing Creativity in DIY Projects
Super glue is a household name when it comes to quick fixes, but its potential goes far beyond simple repairs. This versatile adhesive has sparked a revolution in DIY projects, allowing hobbyists and professionals alike to unleash their creativity.
In this article, we’ll explore the incredible ways super glue can be used to transform your DIY endeavors.
Introduction to the Super Glue Revolution
Imagine having a magic wand that can instantly bond anything you touch. That’s essentially what super glue offers – a powerful, quick-setting adhesive that has revolutionized the world of DIY projects. Whether fixing a broken vase or creating intricate art, super glue is the unsung hero of countless creative endeavors.
The History of Super Glue
Super glue, also known as cyanoacrylate adhesive, was accidentally discovered in 1942 by Dr. Harry Coover during World War II. Initially dismissed for being too sticky, it wasn’t until 1958 that it was recognized for its practical uses and marketed as a commercial product. This sticky discovery has since become a staple in homes and workshops worldwide.
What Makes Super Glue So Effective?
The effectiveness of super glue lies in its unique chemical composition. Cyanoacrylate adhesives polymerize rapidly in the presence of moisture, forming strong, durable bonds almost instantly. This quick-setting property makes super glue an indispensable tool for various applications, from everyday fixes to complex DIY projects.
Types of Super Glue
Not all super glues are created equal. Here are some common types:
- Standard Super Glue: Ideal for general repairs and small projects.
- Gel Super Glue: Perfect for vertical surfaces and porous materials.
- Specialty Super Glue: Designed for specific materials like plastic, metal, or glass.
Understanding the different types helps you choose the right glue for your project, ensuring a strong and lasting bond.
Creative DIY Projects Using Super Glue
Super glue is not just for repairs; it can catalyze creativity. Here are some imaginative DIY projects where super glue plays a starring role:
- Jewelry Making: Create custom pieces with beads, stones, and findings.
- Model Building: Assemble detailed models with precision and ease.
- Decorative Crafts: Enhance home decor with personalized touches.
Crafting with Super Glue
Craft enthusiasts love super glue for its versatility and reliability. Whether working with paper, fabric, or mixed media, super glue can help bring your artistic vision to life. It’s like having an extra pair of hands that never let go, allowing you to focus on the creative process.
Home Repairs Made Easy
Super glue is a go-to solution for quick home repairs. It provides a strong bond that can withstand everyday wear and tear from fixing a loose tile to mending a broken chair leg. It’s like having a mini handyman in your toolbox, ready to tackle minor issues in a snap.
Super Glue in Woodworking
In woodworking, super glue can be used for everything from assembling furniture to creating intricate inlays. Its fast-setting nature means you can work quickly and efficiently, making it a valuable asset in any woodworker’s arsenal. Think of it as the secret ingredient that turns good projects into great ones.
Innovative Uses in Electronics
Super glue’s precision and strength make it ideal for delicate electronics repairs. Whether fixing a cracked phone screen or securing loose wires, it offers a reliable solution without the bulk of traditional adhesives. It’s like giving your gadgets a second chance at life with just a tiny drop.
Safety Tips When Using Super Glue
While super glue is incredibly useful, it’s essential to use it safely. Here are some tips to keep in mind:
- Avoid Skin Contact: Super glue bonds skin instantly. Wear gloves to protect your hands.
- Work in a Well-Ventilated Area: The fumes can be irritating, so ensure proper ventilation.
- Keep Out of Reach of Children: Store super glue safely to prevent accidental ingestion or misuse.
Maintaining Your Super Glue Supplies
To ensure your super glue stays effective, proper storage is crucial. Keep it in a cool, dry place and tightly sealed when not in use. This prevents it from drying out and ensures it’s ready to go when needed.
Eco-Friendly Alternatives
For those looking to reduce their environmental impact, eco-friendly adhesive options are available. Some brands offer biodegradable or non-toxic super glues that provide the same strong bond without the environmental footprint.
Troubleshooting Common Issues
Even with the best super glue, you might encounter some common issues. Here’s how to solve them:
- Glue Won’t Bond: Ensure the surfaces are clean and dry.
- Clogged Nozzle: Clear the nozzle with a pin or store the glue with the cap tightly closed.
- Bonds Too Quickly: Work quickly and precisely, and consider using a slower-setting glue for intricate projects.
Case Studies of Creative Uses
To illustrate the versatility of super glue, here are a few real-life examples:
- Artist’s Workshop: An artist used super glue to create intricate sculptures from mixed media materials, showcasing the glue’s ability to bond different surfaces seamlessly.
- DIY Enthusiast: A DIYer transformed their home with custom wall art and repairs, all made possible by the strong bonds of super glue.
Conclusion
The super glue revolution has truly transformed the world of DIY projects, making it easier than ever to repair, create, and innovate. With its versatility, strength, and quick-setting properties, super glue is an indispensable tool in any DIY enthusiast’s toolkit.
Whether crafting, repairing, or building, super glue helps you unleash your creativity and achieve professional-looking results.
FAQs
What types of super glue are available?
There are several types, including standard, gel, and specialty super glues designed for specific materials.
Can super glue be used on all surfaces?
While superglue works on many surfaces, it’s best to choose a type that is suited for the material you are working with.
Is super glue safe to use?
Yes, but using it in a well-ventilated area and avoiding skin contact by wearing gloves is important.
How do I remove superglue if I make a mistake?
Acetone, commonly found in nail polish remover, can dissolve super glue. Use it carefully to avoid damage to surfaces.
Can superglue be used for outdoor projects?
Some types of superglue are designed for outdoor use, offering water-resistant and weatherproof properties.