

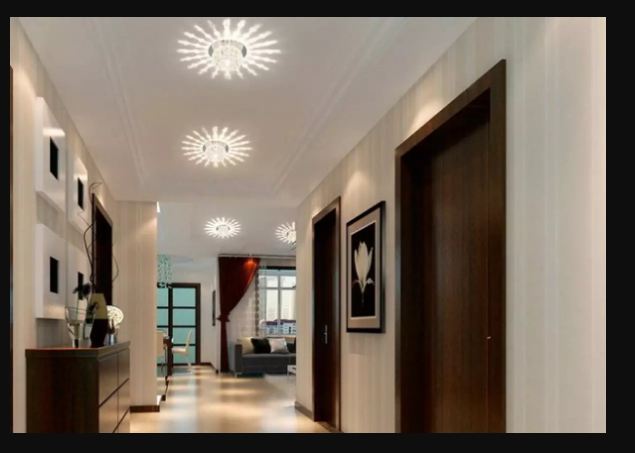
How to Choose the Right Hallway Ceiling Lights for Your Home’s Style and Functionality
Your hallway is the first space guests see when they enter your home it sets the tone for everything that follows. Yet, many people overlook hallway lighting, thinking of it as merely functional. The truth is, the right hallway ceiling lights can completely transform the look and feel of your space, making it welcoming, stylish, and practical all at once.
Why Hallway Lighting Matters
Lighting is the silent ambassador of your home. It creates ambiance and subtly defines your style. A poorly lit hallway can make your home feel dull or cramped, while a well-lit one feels open and inviting. The perfect hallway ceiling light should blend beauty and practicality. It must provide enough illumination for safety while also complementing your interior décor.
Understanding Different Types of Hallway Ceiling Lights
Choosing the Right Size of Ceiling Light
Lighting Styles That Match Your Home Décor
Light Bulb Choices and Their Effects
LEDs last longer, use less energy, and are available in multiple color temperatures. Incandescents give a warmer, more nostalgic glow but consume more power. Use warm white (2700–3000K) for coziness, or cool white (4000–5000K) for a brighter, cleaner feel. Adjust brightness according to hallway size.
Energy Efficiency Considerations
Layering Lights for Depth and Warmth
Choosing the Right Material and Finish
When selecting the right material and finish for your hallway ceiling lights, consider how each element complements your home’s overall design. Metal finishes like brushed nickel or matte black lend a modern, sleek appeal, while antique brass or bronze add a classic touch. For a softer, more elegant look, glass or crystal fixtures beautifully reflect light, enhancing brightness and ambiance. If you prefer a warm, natural vibe, materials such as wood, rattan, or linen can bring an inviting, organic charm to your hallway.
Hallway Lighting for Small Spaces
Lighting a small hallway can be tricky, but the right choices can make a huge difference. Opt for bright, evenly distributed light to open up the space and make it feel larger. Flush mount or recessed ceiling lights are ideal since they provide ample illumination without overwhelming the area. You can also add mirrors or light-colored walls to reflect light and enhance the sense of spaciousness, creating a warm and inviting passageway.
Lighting Controls and Dimmers
Adding lighting controls and dimmers to your hallway is a simple yet effective way to create the perfect ambiance. With dimmable lights, you can easily adjust the brightness depending on the time of day or mood bright for mornings and softer for evenings. Modern smart control systems even allow you to manage lighting with your phone or voice, offering both convenience and energy efficiency. It’s a small upgrade that brings a big difference to your home’s comfort and style.
Installation Tips and Safety
Trendy Hallway Ceiling Light Ideas for 2025
Budget-Friendly Hallway Lighting Ideas
Creating a stylish hallway doesn’t have to break the bank. You can find affordable ceiling lights that still look chic and modern. Consider these tips:
-
Shop Smart: Look for sales, discounts, or online deals to get quality lights at lower prices.
-
Energy-Efficient Options: Choose LED or energy-saving bulbs to cut long-term costs.
-
DIY Upgrades: Refresh existing fixtures with new shades, paint, or creative covers for a fresh look.
Conclusion
Your hallway ceiling lights do more than brighten a path they define the atmosphere of your home. Whether you prefer sleek modern fixtures or cozy rustic designs, the key is balance. Think about function, proportion, and personal style, and your hallway will glow with charm and purpose.
FAQs About Hallway Ceiling Lights
1. What type of ceiling light is best for low hallways?
Flush mount lights work best as they provide bright illumination without taking up headroom.
2. How many lights should I install in a long hallway?
Generally, one light every 8–10 feet ensures even coverage without dark spots.
3. Are LED hallway lights worth it?
Absolutely LEDs are energy-efficient, long-lasting, and available in various styles and colors.
4. Can I mix different lighting styles in one hallway?
Yes, but maintain a cohesive color temperature and overall theme for a harmonious look.
5. How bright should hallway lights be?
Aim for 300–400 lumens per square meter for adequate brightness without glare.
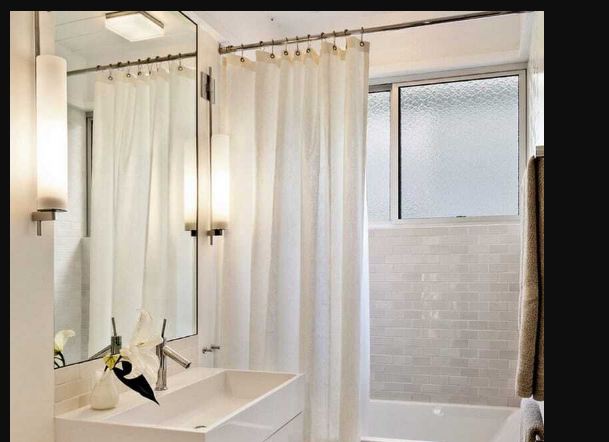
Best Stunning Ruffle Shower Curtains Designs to Decor Your Bathroom
Ruffle shower curtains are the perfect blend of elegance and charm that can instantly elevate any bathroom space. With their soft, layered textures, they bring a sense of luxury and sophistication, turning a plain shower area into a cozy, stylish retreat. Whether you prefer modern simplicity or vintage romance, these curtains offer endless design possibilities.
What Are Ruffle Shower Curtains?
Ruffle shower curtains are decorative curtains with layered or frilled edges that create a soft, voluminous appearance. Unlike plain curtains, ruffled designs add dimension and movement, giving the bathroom a plush, high-end aesthetic. These curtains are available in various fabrics, colors, and designs, making them a versatile choice for all décor styles.
Benefits of Using Ruffle Shower Curtains
Popular Materials for Ruffle Shower Curtains
Ruffle shower curtains come in a variety of materials, each offering a unique look and feel. Cotton is a popular choice for its soft texture and natural appeal, perfect for a cozy, farmhouse-style bathroom. Polyester options are durable, water-resistant, and easy to clean, making them ideal for everyday use. For those seeking balance, blended fabrics combine the comfort of cotton with the practicality of synthetic fibers, ensuring both elegance and longevity. These materials not only enhance the curtain’s beauty but also ensure it remains functional and easy to maintain.
Trending Color Themes
Ruffle shower curtains come in a variety of colors that can transform your bathroom’s mood and style. From soft neutrals to bold shades, choosing the right palette can elevate the overall ambiance.
-
White and Neutral Tones: Create a calm, spa-like environment with shades of white, beige, or cream.
-
Pastel Elegance: Soft hues like blush pink, mint green, and lavender add a gentle, romantic charm.
-
Bold and Vibrant Shades: Deep blues, emerald greens, or burgundies bring a striking and modern appeal.
Best Ruffle Shower Curtain Designs
Ruffle shower curtains come in a wide range of stunning designs that suit every bathroom style and mood. From tiered elegance to bohemian charm, each type brings its own personality and flair to your space. Here are some of the best ruffle shower curtain designs to explore:
-
Tiered Ruffle Curtains: Multiple layered ruffles create a luxurious, voluminous appearance that adds depth and texture.
-
Ombre Ruffle Curtains: With a smooth color gradient, these curtains introduce a soft artistic touch to modern bathrooms.
-
Bohemian-Style Ruffle Curtains: Featuring lace edges or flowy fabrics, they bring a free-spirited, relaxed vibe.
-
Vintage Lace Ruffles: Perfect for classic interiors, these designs add romance and old-world elegance.
-
Minimalist Single-Layer Ruffles: A simple, clean design offering subtle charm without overpowering your décor.
Choosing the Right Ruffle Shower Curtain
Selecting the perfect ruffle shower curtain depends on your bathroom’s overall theme and atmosphere. Start by considering the color palette—soft neutrals for a serene look or vibrant shades for a bold statement. Measure your shower area carefully to ensure the curtain fits well without dragging or looking too short. Also, pay attention to fabric type; cotton gives a cozy feel, while polyester offers durability and easy maintenance. The right choice will seamlessly tie your bathroom’s design elements together for a polished, stylish finish.
Ruffle Shower Curtains for Different Bathroom Styles
Ruffle shower curtains can beautifully adapt to any bathroom décor, offering a perfect mix of charm and personality. Whether your style is modern, rustic, or coastal, these curtains add texture and warmth that elevate the overall ambiance.
Points:
-
Modern Minimalism: Choose sleek, neutral-toned ruffles for a clean and elegant look.
-
Rustic Farmhouse: Go for cotton or linen fabrics with soft, natural hues for a cozy vibe.
-
Glamorous Chic: Opt for silk-like materials or metallic shades to add a luxurious touch.
-
Coastal and Nautical: Light blue or seafoam green ruffles bring a fresh, breezy ocean feel.
Tips for Maintaining Ruffle Shower Curtains
Keeping your ruffle shower curtains in top shape is simple with regular care. Wash them gently every few weeks to remove moisture and soap buildup, and always let them dry completely to prevent mildew. Handle the ruffles carefully to preserve their shape and softness.
Points:
-
Wash regularly using a gentle cycle.
-
Allow proper air drying after each use.
-
Avoid harsh scrubbing or wringing.
-
Fold neatly for storage to prevent wrinkles.
DIY Ruffle Shower Curtain Ideas
Where to Buy Stunning Ruffle Shower Curtains
Budget-Friendly Ruffle Shower Curtain Options
Common Mistakes to Avoid
How to Style Your Bathroom with Ruffle Shower Curtains
Conclusion
Ruffle shower curtains bring charm, elegance, and warmth to any bathroom. Whether you’re decorating a cozy cottage or a modern apartment, these curtains can effortlessly uplift your space. With a variety of designs, colors, and materials, you’ll surely find one that matches your personality and style.
FAQs About Ruffle Shower Curtains
1. Are ruffle shower curtains suitable for small bathrooms?
Yes, especially in light colors—they make the space appear larger and brighter.
2. Can I wash ruffle shower curtains in the machine?
Most are machine washable, but always check the care label first.
3. Do I need a liner with a ruffle shower curtain?
Yes, a liner helps prevent mildew and prolongs the curtain’s life.
4. What’s the best material for long-lasting ruffle curtains?
Polyester or blended fabrics tend to hold up well over time.
5. Can I iron a ruffle shower curtain?
Use a low-heat setting or a steamer to remove wrinkles without damaging the ruffles.
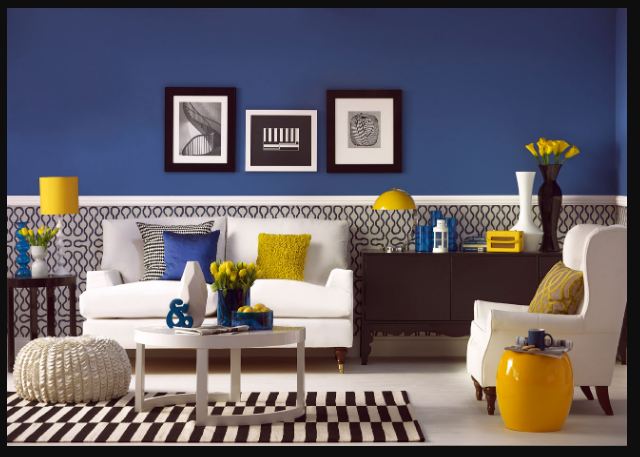
The Psychology of Color in Interior Design
Color is more than visual decoration it’s communication. It speaks without words, influences mood, and shapes how we feel inside a room. When it comes to interior design, color psychology is one of the most powerful but underrated tools. If you’ve ever felt instantly relaxed by soft blues or energized by a warm orange accent wall that’s color psychology working in real-time.
What Is Color Psychology?
Psychology of Color studies the emotional and behavioral connection between humans and color. We don’t just “see” color we “feel” it. It blends science, emotional perception, cultural background, and visual experience. The brain interprets colors through the visual cortex. Certain tones trigger specific neural responses some stimulate, others soothe. For instance, red increases heart rate while blue tends to slow it down. Colors basically act as emotional codes.
Why Color Matters in Interior Spaces
Color shapes the emotional atmosphere of a space more than most people realize. The tones we choose for our walls, décor, and furniture influence how safe, energized, or relaxed we feel inside a room. A warm shade can turn a basic space into a cozy retreat, while a cool palette can make it feel airy and peaceful. In interior design, color is the silent designer it sets the mood before any furniture is even added.
Warm vs Cool Tones in Interior Psychology
Warm tones like red, orange, and yellow naturally evoke feelings of coziness, energy, and stimulation think of the warmth of a sunset or firelight. These shades make rooms feel inviting and lively. On the other hand, cool tones such as blue, green, and purple bring calmness, relaxation, and a sense of spaciousness similar to ocean waves or a clear sky. Cool colors are ideal for spaces where peace, clarity, and mental ease are desired. Balancing warm and cool tones helps create both comfort and emotional harmony in interior design.
The Science Behind Color Choices
Color selection isn’t random it’s backed by psychology and biology. Different hues activate different neurological pathways, influencing hormones, heart rate, and even perception of temperature. That’s why designers use warm tones to stimulate energy and cool tones to encourage calmness. In interior design, choosing a color isn’t just about style it’s about crafting emotional experiences with purpose.
The Influence of Cultural Perception
Color doesn’t speak the same language everywhere meaning shifts from region to region. For example, while white symbolizes purity in Western culture, it may represent mourning in certain Eastern traditions. This is why interior design isn’t a one-style-fits-all concept. Designers often consider cultural backgrounds to ensure colors resonate emotionally and respectfully with the people who live in the space.
The Impact of Color in Different Rooms
Neutral Palettes and Minimalism Psychology
Neutral color palettes create a calming sense of balance in a space because they don’t overwhelm the eyes or emotions. Shades like beige, cream, taupe, greige, and soft whites bring clarity and simplicity almost like a mental reset. That’s why minimalism pairs so well with neutrals: it lets the mind focus on what matters without noise, clutter, or visual stress.
How Brands Use Color Even Indoors
Brands strategically use color indoors to influence mood and behavior. Hotels often choose calming shades in lobbies and hallways to make guests feel relaxed and welcome. Restaurants use warm colors like reds and oranges to stimulate appetite and encourage social interaction. Offices incorporate blues and greens to promote focus, productivity, and a sense of calm. Every color choice is intentional, shaping how people experience a space without them even realizing it.
Popular Colors and Their Psychological Meaning
Color Trends in Modern Interior Design
Modern interior design is embracing colors inspired by nature and calm, balanced tones. Earthy shades like warm clay, terracotta, and muted browns bring a cozy, grounded feeling to spaces. Biophilic greens are increasingly popular, connecting interiors with natural elements and promoting wellness. Soft, warm grays are also trending, providing a versatile backdrop that pairs well with both bold accents and minimalist designs. These trends focus on creating harmony, comfort, and a sense of connection with the environment.
Color Mistakes to Avoid
Choosing the Right Color for Your Home
Conclusion
Color is emotional architecture. In interior design, color psychology transforms houses into homes by speaking directly to our moods. Whether soothing blue bedrooms or energizing warm-toned kitchens every shade shapes behavior. So the next time you choose paint, don’t just pick based on aesthetics choose based on how you want to feel.
FAQs About Psychology of Color
1. What color is best for relaxation?
Blue and lavender are ideal for relaxation.
2. Which colors increase productivity?
Blues and greens boost focus and clarity.
3. Should I avoid using red in a bedroom?
Yes red can overstimulate and disrupt sleep.
4. Are neutral colors boring?
No. With the right texture and lighting, neutrals can feel luxurious.
5. What’s the trending color of 2025?
Earth-infused greens and warm clay undertones are leading trends.
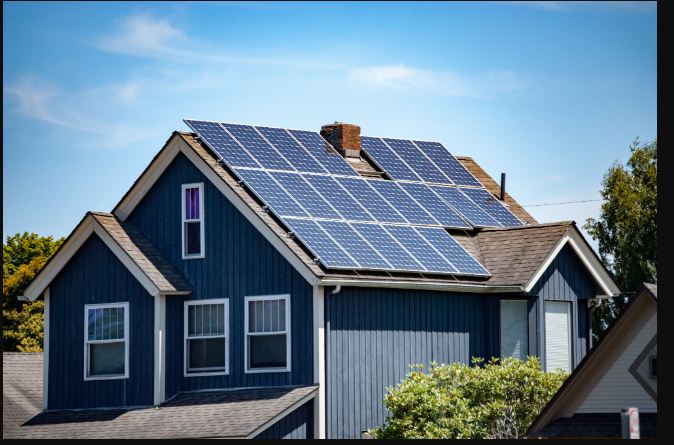
The Benefits of Combining a Tar and Gravel Roof with Solar Panels
Thinking about going solar but have a tar and gravel roof? You’re not alone. Many property owners with flat or low-slope roofs are discovering the unique benefits of pairing traditional tar and gravel systems with modern solar technology. This combination not only enhances your home’s efficiency but also contributes to a greener future.
What is a Tar and Gravel Roof?
A Tar and Gravel Roof with Solar Panels, often used on flat or low-pitch structures, consists of multiple layers of bitumen (tar) and reinforcing fabrics, topped with a layer of gravel or stone. The gravel protects the roof from UV rays and physical damage, extending its life. Typically, these roofs use alternating layers of asphalt and fiberglass or felt sheets, sealed together to create a waterproof barrier. The final layer of gravel helps anchor everything in place while providing durability and insulation.
-
Durability: Lasts 20–30 years with proper care.
-
UV Protection: The gravel layer reflects sunlight.
-
Cost-Effective: Affordable compared to other flat-roof systems.
-
Sound Insulation: Reduces outside noise effectively.
Regular inspections are key. Cleaning debris, reapplying sealant when needed, and checking for blisters or cracks can easily extend the roof’s life by several years.
Basics of Solar Panel Systems
Solar panels capture sunlight and convert it into electricity using photovoltaic (PV) cells. This clean energy can power your home, reduce utility bills, or even feed excess power back into the grid. Flat roofs like tar and gravel ones work best with tilted rack-mounted panels or ballasted systems these don’t require roof penetration and minimize structural stress.
-
Significant reduction in energy bills
-
Low maintenance and long lifespan
-
Positive environmental impact
-
Government incentives and tax credits
Compatibility Between Tar and Gravel Roofs and Solar Panels
Absolutely! With the right mounting system, solar panels can be securely installed without damaging your roof’s surface. Ballasted racking systems are especially ideal for such setups. Most installers use non-penetrating mounts that rest on top of the gravel, ensuring the waterproof integrity remains intact. Adjustments are made for slope and orientation to maximize sunlight capture. Before installation, your roof’s structure must be assessed to ensure it can handle the combined weight of panels and racks. Typically, tar and gravel roofs are strong enough for standard solar arrays.
Benefits of Combining Tar and Gravel Roofs with Solar Panels
Solar energy drastically cuts electricity costs. Many homeowners see a return on investment within 5–7 years. Solar panels act as a shield, protecting the tar and gravel surface from direct sunlight and temperature fluctuations, reducing wear and tear. This pairing promotes sustainability by reducing both your energy consumption and reliance on fossil fuels. Homes with solar systems typically sell faster and for higher prices due to energy efficiency benefits.
Installation Process
Maintenance and Care
Keep panels clean from dust, leaves, and debris to maintain efficiency. A gentle rinse every few months usually suffices. Inspect the tar and gravel layer for any signs of cracks or exposed tar. Prompt repairs prevent moisture damage. Avoid walking directly on panels, ensure proper drainage, and check wiring regularly for wear.
Cost and ROI
Investing in solar panels on a tar and gravel roof may seem costly upfront, with average installation prices ranging from $15,000 to $25,000 depending on system size and roof condition. However, the long-term financial benefits far outweigh the initial expense. Homeowners typically experience a significant drop in electricity bills sometimes up to 70% and many recover their investment within 5 to 7 years. Additionally, government tax credits and renewable energy incentives can further reduce costs, making this combination both financially and environmentally rewarding.
Environmental Impact
Potential Challenges
Best Practices for Longevity
To ensure long-term performance, schedule professional inspections at least twice a year to catch early signs of wear or damage on both the roof and solar panels. Use only high-quality materials and mounting systems designed for tar and gravel roofs to maintain structural integrity. Keep the panels clean and monitor energy production regularly any sudden drop in output can indicate maintenance needs. With proper care and attention, your combined system can deliver reliable performance and savings for decades.
Real-Life Case Studies
Several homeowners and commercial property owners have successfully installed solar panels on tar and gravel roofs with outstanding results. For instance, office buildings in urban areas have reported a 20–30% reduction in annual energy costs after installation. In residential settings, the panels not only improved energy efficiency but also extended the roof’s lifespan by shielding it from direct sunlight. These success stories highlight how well traditional roofing systems can integrate with modern solar technology for long-term savings and sustainability.
Comparing Other Roof Types
When it comes to solar panel installation, tar and gravel roofs offer a unique balance of durability and affordability compared to other roof types.
-
Metal Roofs: Lightweight and long-lasting but often more expensive.
-
Single-Ply Membrane Roofs: Easy to install solar panels on, but may require extra care for puncture prevention.
-
Tar and Gravel Roofs: Cost-effective, strong, and ideal for flat surfaces with proper installation.
Future of Solar Roofing
Conclusion
Combining a tar and gravel roof with solar panels offers a smart, sustainable way to save money and protect your property. This pairing not only enhances energy efficiency but also supports a cleaner environment an investment that pays back in both financial and ecological terms.
FAQs About Tar and Gravel Roof with Solar Panels
1. Can I install solar panels on an old tar and gravel roof?
Yes, but ensure it’s inspected and possibly reinforced before installation.
2. How long does this type of setup last?
Solar panels last around 25–30 years, often outliving the roof itself.
3. Does the gravel interfere with installation?
Installers typically clear gravel in panel areas or use ballast mounts for stability.
4. Will my roof warranty be affected?
Most warranties remain valid if installation follows manufacturer guidelines.
5. Is maintenance difficult?
Not at all regular inspections and occasional cleaning are usually enough.
5 Reasons Why Acrylic Bathroom Accessories are the Perfect Addition to Your Home
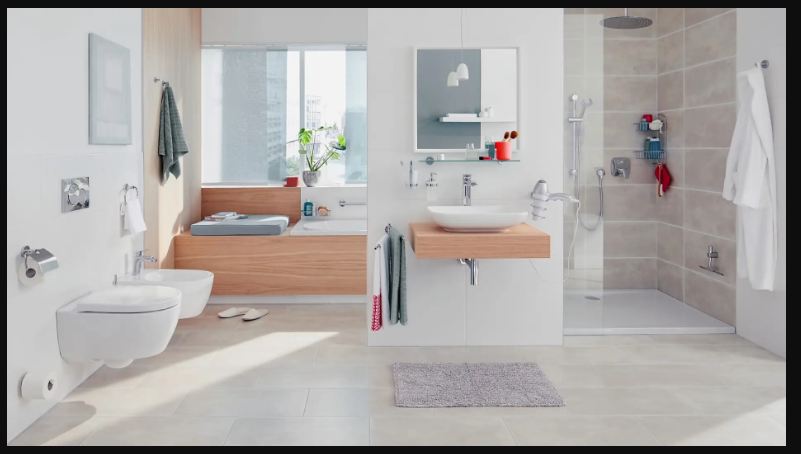
Your bathroom is more than just a functional space it’s a reflection of your style and personality. Choosing the right accessories can instantly elevate its look and feel. That’s where acrylic bathroom accessories come in. Loved for their sleek design and practical benefits, these items are quickly becoming a must-have in modern homes.
What Are Acrylic Bathroom Accessories?
Acrylic bathroom accessories are made from a durable, transparent plastic material known as acrylic. They mimic the beauty of glass while being lighter and stronger. From soap dispensers and toothbrush holders to storage trays and tissue boxes, these accessories bring elegance and practicality to your bathroom.
Sleek and Modern Design
One of the biggest reasons to choose acrylic bathroom accessories is their stunning design. The clear, glossy finish creates a sophisticated and airy look, giving your bathroom a modern feel. Whether your decor is minimalist, vintage, or luxurious, acrylic seamlessly blends in. Acrylic accessories fit effortlessly into any setting be it a small powder room or a master suite. Their neutral transparency enhances both light and space, making them perfect for compact bathrooms that need a touch of openness and charm.
Durability and Longevity
Unlike fragile glass or ceramic, acrylic is tough and long-lasting. It resists cracks, chips, and scratches, even with daily use. Its waterproof nature makes it ideal for humid environments like bathrooms, ensuring that your accessories stay pristine for years. Because they’re shatterproof and sturdy, acrylic accessories are ideal for families with children or pets. You don’t have to worry about breakage or constant replacements making them a smart investment for everyday life.
Easy to Clean and Maintain
Nobody wants to spend hours scrubbing bathroom accessories. Thankfully, acrylic’s non-porous surface makes cleaning effortless. A quick wipe with a soft cloth and mild soap keeps it looking crystal clear and spotless. Acrylic doesn’t absorb stains or odors, which makes it perfect for busy households. With minimal maintenance, your bathroom stays fresh and stylish without the hassle.
Lightweight and Safe
Acrylic is significantly lighter than glass, making it safer and easier to handle. You can move or reposition accessories without fear of dropping or damaging them ideal for both children and seniors. If you love rearranging or redesigning your bathroom, acrylic pieces are your best friend. Their lightweight design allows for easy repositioning, giving you flexibility without compromising style.
Budget-Friendly Elegance
Want a luxurious look without overspending? Acrylic bathroom accessories offer the elegance of glass at a fraction of the cost. They give your space a high-end appearance without stretching your budget. Many homeowners choose acrylic for its ability to mimic expensive materials like crystal or marble. It’s a simple way to achieve a designer look while keeping things affordable and practical.
How to Choose the Right Acrylic Accessories
When shopping for acrylic accessories, consider the overall theme of your bathroom. Choose designs that match your fixtures and color palette. Opt for quality items with smooth edges and clear finishes to ensure longevity and elegance. Buying a coordinated set creates a cohesive, stylish look.
Tips for Maintaining the Shine
Environmental Benefits of Acrylic
Acrylic is a recyclable material, making it an eco-friendly choice. Its long lifespan reduces the need for frequent replacements, helping minimize waste. Many modern manufacturers also use sustainable production processes, making acrylic a responsible option for environmentally conscious homes.
Where to Buy the Best Acrylic Bathroom Accessories
You can find a wide selection of acrylic bathroom accessories online and in home décor stores. Popular options include design boutiques and home improvement brands that offer custom sets. Always look for reputable retailers to ensure quality and durability.
Conclusion
Acrylic bathroom accessories are more than just decorative pieces they’re a perfect blend of beauty, durability, and practicality. From their modern design to their budget-friendly charm, they transform ordinary bathrooms into elegant sanctuaries. If you’re looking to upgrade your space effortlessly, acrylic is the smart and stylish choice.
FAQs About Acrylic Bathroom Accessories
1. Are acrylic bathroom accessories durable?
Yes, acrylic is highly durable, resistant to cracks and scratches, making it ideal for daily use.
2. How do you clean acrylic bathroom accessories?
Simply wipe with a soft cloth and mild soap. Avoid harsh chemicals to maintain clarity and shine.
3. Can acrylic accessories crack or fade?
With proper care, acrylic doesn’t easily crack or discolor. Keep it away from extreme heat or direct sunlight.
4. Are they safe for kids?
Absolutely! Acrylic is shatterproof, lightweight, and safe for use around children and the elderly.
5. Where can I find affordable sets?
You can explore online marketplaces, home décor stores, or specialty retailers that offer stylish acrylic sets at great prices.
5 Creative Ways to Dress Up Your Living Room Window
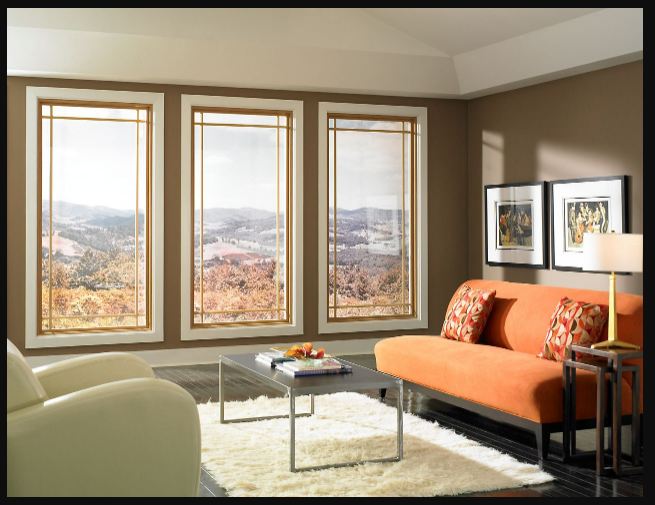
A living room window isn’t just something to let outside light in. It’s a feature. It’s a mood setter. It frames your view whether that’s a city skyline, a quiet neighborhood street, or your backyard garden. But most people leave it boring. Plain curtains, one rod, one fabric, zero personality. Let’s fix that. Below, you’ll find creative, beautiful, and realistic ways to style your living room window so your space finally feels “finished.”
Why Living Room Windows Matter
Living room windows are more than just openings that let light in they influence how a space feels and functions. The right window treatment can change the entire mood, making the room cozier, brighter, or more balanced. Whether you’re trying to create privacy, enhance natural light, or highlight a beautiful view, styling your living room window plays an important role in shaping your home’s personality.
Understanding the Role of Window Styling
Add Stylish Layered Curtains
Layered curtains instantly elevate your living room window by adding depth, softness, and visual interest. Pair sheer curtains with blackout drapes to balance light control and privacy without sacrificing style. This combination lets you filter daylight during the day while still keeping your cozy evening privacy. It’s a simple upgrade that makes the entire room feel more elegant and thoughtfully styled.
Install Roman Shades
Installing Roman shades is an easy way to add elegance and functionality to your windows. These fabric shades fold neatly when raised and create a smooth, tailored look when lowered. They offer excellent light control, privacy, and a soft decorative touch to any room. Choose a color or pattern that complements your décor, and ensure proper measurements for a perfect fit and seamless installation.
Use Chic Window Blinds
Chic window blinds can instantly elevate the look of any room, adding both style and functionality. They allow you to control natural light while maintaining privacy, creating the perfect ambiance throughout the day. Whether you choose sleek roller blinds, elegant wooden slats, or modern fabric shades, they can complement any interior design. Plus, their clean lines and minimalist appeal make them a timeless choice for both classic and contemporary homes.
Decorate the Window Frame With Plants
Transform your window frame into a vibrant green oasis by placing small potted plants or trailing vines along the sill. Choose a mix of flowering and leafy plants to create depth and color, allowing sunlight to nourish them naturally. Hanging planters or small shelves can add height and dimension, turning an ordinary window into a lively, eye-catching feature in your home. Regularly rotate and care for the plants to keep them thriving and visually appealing.
Add a Window Seat or Cozy Nook
Extra Styling Tips
Final Thoughts
You don’t need a major renovation to make your living room window stand out. A few thoughtful touches a layered curtain, a set of Roman shades, maybe a window plant can transform the entire emotional tone of your space. Try one idea this week see how much your living room energy changes.
FAQs About Living Room Window
1. What is the best window treatment for a small living room?
Roman shades or sheer curtains they keep the space light.
2. How do I make windows look bigger?
Hang curtain rods higher above the frame.
3. Are window blinds still stylish in 2025?
Yes especially wooden and textured fabric blinds.
4. Should curtains match the sofa color?
They don’t have to just stay within the same tone family.
5. Are window plants hard to maintain?
Not at all choose low-maintenance types like pothos or snake plants.
Discover the Beauty of Medinilla Apoensis: A Guide to Growing and Caring for This Exotic Plant
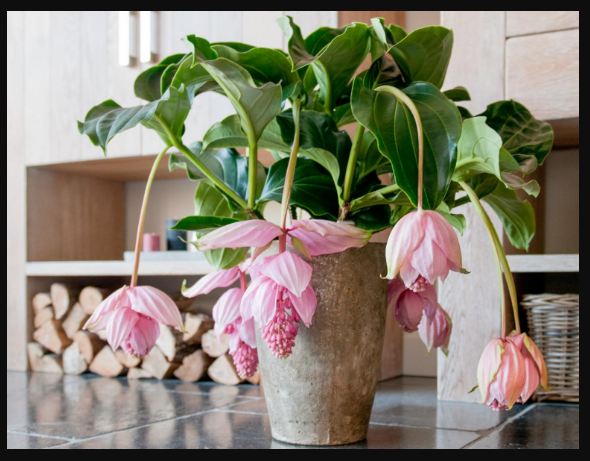
Imagine stepping into a tropical paradise right inside your living room. The Medinilla Apoensis, with its glossy leaves and cascading pink blossoms, can transform any corner into a lush retreat. This exotic plant isn’t just about good looks it’s a living piece of art that rewards patient care with unmatched elegance.
What Is Medinilla Apoensis?
The Medinilla Apoensis is a rare species of flowering plant belonging to the Melastomataceae family. It’s native to the Philippines and is named after Mount Apo, the country’s highest peak. Unlike its more common cousin, Medinilla magnifica, this variety is lesser-known but equally stunning.
Origin and Natural Habitat
Found primarily in the tropical rainforests of Mindanao, Medinilla Apoensis thrives in high humidity and dappled sunlight. In the wild, it often grows as an epiphyte meaning it lives on trees without drawing nutrients from them. This gives you a clue about how to care for it at home: airy, moist, and bright environments work best.
Why Medinilla Apoensis Is So Special
Few plants combine exotic beauty and resilience like the Medinilla Apoensis. Its drooping flower clusters look like pink chandeliers, while its leathery leaves exude a deep green sheen. Beyond aesthetics, it symbolizes serenity and tropical luxury, making it a prized choice for collectors and plant enthusiasts.
Key Features and Appearance
The leaves of Medinilla Apoensis are broad, leathery, and rich green with prominent veins. They can grow up to 8 inches long, creating a lush canopy that instantly draws attention. The plant produces cascading clusters of pink to lavender blossoms, typically during late spring and early summer. The blooms last for weeks, filling your space with a soft, tropical vibe.
Ideal Growing Conditions
To help your Medinilla Apoensis thrive, it’s essential to recreate its natural tropical environment. This means providing the right balance of warmth, light, and humidity so the plant can flourish and bloom beautifully.
Key Points:
-
Maintain temperatures between 65°F–80°F (18°C–27°C) for optimal growth.
-
Place the plant in bright, indirect sunlight to prevent leaf scorch.
-
Keep humidity levels high (60–80%), using misting or a humidifier if needed.
How to Grow Medinilla Apoensis
Propagating Medinilla Apoensis can be done through stem cuttings. Choose a healthy stem with at least two leaves, dip the cut end in rooting hormone, and plant it in moist, well-draining soil. Cover with a plastic dome or bag to maintain humidity until roots form. Use a loose, airy mix a combination of orchid bark, perlite, and peat moss works wonders. The goal is to prevent waterlogging while keeping the roots moist and oxygenated.
Watering and Feeding Guidelines
Water deeply but infrequently. Wait until the top inch of soil feels dry before watering again. Overwatering is the quickest way to cause root rot remember, less is more. Feed your Medinilla Apoensis with a balanced, water-soluble fertilizer every two weeks during the growing season. Reduce feeding in winter when the plant’s growth slows down.
Pruning and Maintenance
Regular pruning keeps your Medinilla Apoensis healthy, tidy, and blooming beautifully. Trim away any dead, yellowing, or damaged leaves to encourage new growth and maintain its shape. After the flowering season, cut back the spent flower stems to help the plant conserve energy for future blooms. Light pruning also improves air circulation, reducing the risk of pests and fungal issues. With consistent care, your Medinilla Apoensis will stay lush and vibrant year-round.
Common Problems and How to Fix Them
This often signals overwatering or poor drainage. Check your soil and adjust your watering schedule. Watch for aphids, mealybugs, and spider mites. Wipe leaves with neem oil or mild soap solution to keep pests at bay. Always ensure your pot has proper drainage holes. If the plant shows signs of wilting and soggy roots, repot it immediately with fresh, dry soil.
Seasonal Care Tips
Repotting Your Medinilla Apoensis
Using Medinilla Apoensis in Home Décor
Benefits of Growing This Exotic Plant
Conclusion
Caring for Medinilla Apoensis is like nurturing a piece of tropical paradise at home. With patience, the right conditions, and consistent care, this stunning plant rewards you with dazzling blooms and lush greenery. Whether you’re a seasoned gardener or just starting your plant journey, the Medinilla Apoensis is a treasure worth growing.
FAQs About Medinilla Apoensis
1. How often should I water my Medinilla Apoensis?
Water only when the top inch of soil feels dry. Overwatering can cause root rot.
2. Can I grow Medinilla Apoensis outdoors?
Yes, but only in tropical or subtropical climates. Otherwise, keep it indoors with plenty of bright, indirect light.
3. How long does it take for Medinilla Apoensis to bloom?
With proper care, it usually blooms once a year, typically in spring or early summer.
4. Is Medinilla Apoensis toxic to pets?
It’s generally considered non-toxic, but it’s still best to keep it out of reach of curious pets.
5. What’s the best potting mix for this plant?
A well-draining mix with orchid bark, perlite, and peat moss provides the ideal environment for healthy roots.

Floral Flourish: A Deep Dive into the Jardinière Aesthetic
Imagine walking into a room where flowers cascade elegantly from a beautifully crafted vessel—a blend of art, nature, and timeless design. That’s the essence of the Jardinière aesthetic. It’s not merely a decorative object; it’s a statement of harmony between craftsmanship and the natural world.
What Does “Jardinière” Mean?
The term Jardinière comes from French, meaning “female gardener” or “planter.” Traditionally, it referred to ornate flower stands or decorative pots used to display plants indoors. Over time, it evolved into a broader artistic concept—representing floral elegance, romanticism, and refined taste.
Historical Roots of the Jardinière Aesthetic
The Jardinière became popular during the Victorian era, when lush interiors and floral displays symbolized sophistication. Wealthy households showcased their plants in elaborate ceramic, bronze, or porcelain jardinières. Art Nouveau and Rococo greatly shaped the Jardinière aesthetic. With flowing lines, organic motifs, and delicate craftsmanship, these movements infused the Jardinière with graceful sensuality and artistic flair.
The Role of Jardinières in Home Décor
A Jardinière serves a dual purpose—practical and ornamental. It holds plants while enhancing a room’s aesthetic. Whether it’s a tall pedestal or a small table-top planter, it introduces visual interest and natural beauty. The Jardinière bridges the gap between human creativity and nature’s organic charm. It brings the outside in, allowing floral beauty to flourish within structured living spaces.
Key Elements of the Jardinière Style
The Jardinière style embodies elegance through intricate craftsmanship, natural motifs, and harmonious design. It captures the essence of nature within artistic structure, creating décor pieces that are both functional and visually enchanting.
Key Points:
-
Shape and Form: Characterized by soft, curved silhouettes that echo the gentle flow of flowers and vines.
-
Materials and Craftsmanship: Often made from porcelain, ceramic, bronze, or wrought iron, each piece showcases exquisite artistry and attention to detail.
-
Color Palettes and Patterns: Gentle pastels and nature-inspired hues dominate, adorned with floral or botanical designs that evoke serenity and grace.
Symbolism Behind Jardinières
The Jardinière represents far more than decorative beauty—it symbolizes growth, renewal, and the nurturing spirit of nature. Each vessel serves as a harmonious union between human creativity and the living world it holds. The flowers within embody vitality and transformation, while the craftsmanship reflects care and intentionality. Together, they express a timeless message of balance, elegance, and the enduring connection between art and life.
Jardinière Aesthetic in Modern Interior Design
Modern decorators reinterpret the Jardinière aesthetic with minimalist tones and sleek finishes. Think matte ceramics paired with lush ferns or orchids—a clean, fresh take on vintage grace. Jardinières effortlessly complement Bohemian, French country, and shabby-chic interiors. Their organic elegance blends seamlessly with wooden textures and soft lighting.
DIY Jardinière Design Ideas
Creating your own Jardinière is a wonderful way to blend creativity with sustainability. With a little imagination, you can transform everyday items into charming decorative pieces that reflect your personal style.
Key Points:
-
Upcycling and Sustainability: Repurpose old pots, containers, or metal tins with paint and texture to give them a fresh, eco-friendly appeal.
-
Personalized Artistic Touches: Add details like mosaic tiles, gold accents, or hand-painted floral patterns to make your Jardinière truly unique and expressive.
How to Style Jardinières in Your Space
Welcome guests with a statement Jardinière filled with seasonal blooms. It instantly sets a warm, inviting tone. Use medium-sized Jardinières as centerpieces. Pair them with candles or crystal décor for a sophisticated touch. Place larger Jardinières on patios or garden paths. They add texture and height variation, creating a layered, lush environment.
Famous Examples and Designers
Caring for Your Jardinière
Proper care ensures your Jardinière remains as stunning as the day you brought it home. Gently clean it with a soft, damp cloth to remove dust and avoid using harsh chemicals that could damage delicate finishes. Keep it in a stable environment—away from direct sunlight, excess moisture, or extreme temperatures—to preserve its color and texture. For ceramic or metal pieces, using a liner inside helps protect against water damage and prolongs the life of both the planter and your plants. With a little care, your Jardinière will continue to radiate timeless charm for years to come.
Why the Jardinière Aesthetic Is Timeless
TheThe Jardinière aesthetic remains timeless because it beautifully unites art, nature, and emotion. Its graceful forms and floral motifs transcend passing trends, offering a sense of warmth and sophistication that never fades. Whether showcased in antique elegance or modern minimalism, Jardinières continue to symbolize harmony, growth, and refined taste. Their enduring appeal lies in their ability to bring life and beauty into any space, making them as relevant today as they were centuries ago.
Jardinières and the Language of Flowers
Emotional and Psychological Impact
The Jardinière aesthetic has a soothing influence on the mind and soul, blending the serenity of nature with artistic beauty. Surrounding yourself with floral arrangements and elegant planters fosters a sense of calm and connection to the natural world. The gentle colors, organic forms, and living greenery can uplift moods, reduce stress, and inspire creativity. In many ways, a Jardinière brings emotional balance—transforming any space into a peaceful sanctuary that nurtures both heart and mind.
Conclusion
The Jardinière aesthetic isn’t just a design trend—it’s a philosophy of living beautifully. It teaches us that nature and artistry belong together. By incorporating this timeless charm into our homes, we create spaces that breathe, bloom, and inspire daily joy.
FAQs About Jardinière Aesthetic
1. What makes a Jardinière different from a regular flowerpot?
A Jardinière is typically more decorative and often used indoors, whereas regular pots are functional for gardening.
2. Can I create a Jardinière aesthetic with modern materials?
Absolutely! Concrete, glass, or recycled materials can all reflect the Jardinière style when designed with elegance.
3. How do I choose the right plant for my Jardinière?
Opt for plants that match your décor’s tone—lush ferns for elegance or succulents for minimalism.
4. Are Jardinières suitable for outdoor spaces?
Yes, but use weather-resistant materials like stone or ceramic for longevity.
5. Why is the Jardinière aesthetic becoming popular again?
Because it embodies timeless beauty—merging sustainability, artistry, and our renewed love for nature-inspired design.
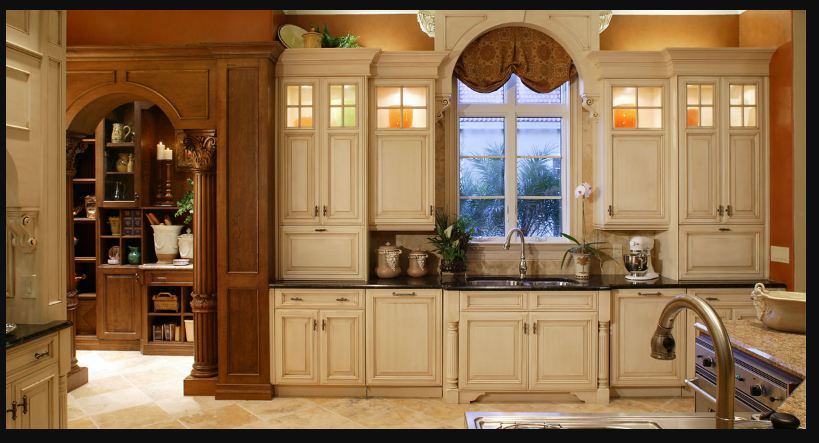
The Timeless Elegance of Arched Cabinets: A Closer Look
There’s something about curves that instantly feels warm, human, and elevated and arched cabinets deliver that feeling effortlessly. Unlike flat-paneled doors that feel rigid and sharp, arches soften edges and add visual interest without demanding bolder patterns or textures.
Why Arches Feel Naturally Classic
Arches have been around since ancient design think Roman architecture, vintage cathedrals, classic European homes. They instantly connect us to old-world luxury. When we place that same shape onto cabinetry, it tells a subtle story curated, sculpted, intentional design. Interestingly, arched cabinets are not just old-school. Newer minimal homes also use them but with slim frames, muted colors, matte finishes, and very clean lines. So even though the shape is classic, the delivery can be ultra-modern.
The Rise of Arched Cabinets in Interior Design
Interior design is shifting. People are tired of square, cold, geometric everything. Now we see designers re-embracing softness curves, waves, organic shapes. Round mirrors, curved sofas, scalloped decor and yes arched cabinetry. Trends are becoming warmer, feminine, cozy. Because they immediately elevate a space. Even a small cabinet can look furniture-grade just because of the curved door frame. It’s interior architecture not just storage.
Materials That Complement Arched Designs
Arched cabinets look their best when paired with materials that highlight depth and curvature. Natural woods like oak, walnut, and ash enhance the softness of the arch because their grains flow in a warm, organic way. For more budget-friendly builds, high-quality veneers or smooth laminates still create that refined curved profile without compromising aesthetics. And when designers add glass inserts within an arched frame, the whole look becomes more elevated letting light and interior styling shine through for a true custom-furniture feel.
Styling Ideas for Different Rooms
Arched cabinets have the flexibility to blend into kitchens, living areas, and bathrooms effortlessly. They can instantly soften a room and make even simple storage feel curated and custom. Each space can carry a slightly different interpretation of the arch from subtle to statement.
Points:
-
Kitchens: perfect for upper display cabinets or a hutch-style island feature
-
Living Rooms: ideal for built-ins, bookcases, or an entertainment niche
-
Bathrooms: adds boutique spa character even in small powder rooms
Color Palettes That Bring Out the Arch
Color choices play a huge role in how well an arched cabinet stands out. Soft earthy tones like warm taupe, natural beige, and light sand create a subtle, organic elegance that highlights the shape gently. Meanwhile, deep saturated hues such as forest green, charcoal navy, or espresso brown give arches a bold, dramatic presence. When the color fits the style, the arch becomes the visual highlight rather than just another cabinet door.
Tips to Pair Arched Cabinets with Decor
To make arched cabinets shine, keep the decor soft, balanced, and intentional. Slim minimalist hardware, warm metals, textured stone, or subtle marble veins all help echo the curves without overwhelming them. Gentle lighting above or inside the cabinet also enhances the arch and creates a cozy, elevated mood.
poni
-
Use simple hardware instead of bulky handles
-
Add warm lighting for extra depth
-
Choose softer materials that complement curves
Are Arched Cabinets Worth the Investment?
Arched cabinets are absolutely worth considering if you’re aiming for something timeless rather than trendy. They instantly elevate a room’s character and make cabinetry look more custom and intentional. While they can cost more than standard square-front designs, their visual impact and the luxury feel they bring often adds long-term value and appeal to your home.
Conclusion
Arched cabinets are not just cabinetry they are moment makers. They soften the mood, add a layer of luxury, and elevate even the simplest room. Whether you love modern minimal or vintage romantic, arches have a seat in both worlds and that’s what makes them timeless.
FAQs About Arched Cabinets
1. Are arched cabinets expensive?
Often yes especially for custom builds but laminates can reduce cost.
2. Do arches only suit traditional homes?
Not at all modern slim arches are trending hard.
3. Can I mix arched cabinets with straight cabinets?
Yes mixing shapes adds character.
4. Are glass arched doors practical in kitchens?
If you curate what goes inside absolutely. They look stunning.
5. Will the arch trend last?
It’s more classic than trendy so yes, it will hold value long term.
Transform Your Home with Trendy Ball Lights Hanging Ideas
If you’ve ever walked into a room and felt an instant sense of warmth and charm, chances are, the lighting had something to do with it. Ball lights hanging are the latest trend in home décor that blend functionality with a cozy, aesthetic appeal. These glowing orbs can instantly transform a dull space into a dreamy retreat.
What Are Ball Lights?
Ball lights are spherical light fixtures that come in various sizes, colors, and materials. They can be hung from ceilings, wrapped around trees, or even suspended in clusters to create a captivating effect. Whether they’re made of glass, paper, or plastic, these lights add a soft, magical touch to any environment. Modern homeowners crave ambiance, not just brightness. Ball lights provide a soft, inviting glow that enhances the beauty of your living spaces while offering flexibility and creativity in design.
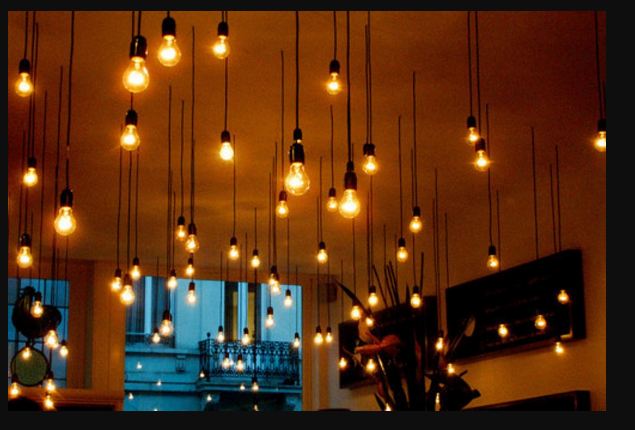
The Magic of Ball Lights Hanging
Ball lights hanging gracefully from the ceiling can act as statement pieces. They add depth, texture, and a sense of wonder to any room. Imagine a cluster of warm white lights floating above your dining table it’s pure enchantment! Beyond beauty, ball lights set the mood. Soft, dimmable light creates relaxation zones ideal for winding down after a long day, while colorful LED ball lights add fun and playfulness to social gatherings.
Different Types of Ball Lights
Indoor Ball Light Ideas
Outdoor Ball Light Inspirations
String ball lights across your garden or patio for a dreamy evening retreat. They make outdoor gatherings feel cozy and intimate. Even a small balcony can look magical with hanging ball lights wrapped around railings or suspended from the ceiling. Floating waterproof ball lights create a mesmerizing reflection on the water perfect for night parties. Guide your guests with softly glowing ball lights lining your walkway. It’s both functional and beautiful.
Seasonal and Festive Uses
Ball lights are perfect for adding a magical touch to any celebration or festive season. During Christmas and holidays, mix warm white, red, and gold ball lights to create a cozy, cheerful atmosphere. For weddings and special events, hanging ball lights can form a dreamy backdrop that enhances the romantic vibe. You can also use colorful or themed ball lights for birthday parties, instantly brightening up the space and making it more lively. No matter the occasion, ball lights bring sparkle, warmth, and joy to every festive moment.
DIY Ball Light Projects
reating your own ball light projects is a fun and affordable way to personalize your home décor. With just a few materials like balloons, string, glue, and LED lights, you can craft stunning handmade orbs that add a warm glow to any room. Start by wrapping glue-soaked string around an inflated balloon, let it dry completely, and then pop the balloon to reveal a delicate sphere. Insert LED lights inside for a beautiful, customized effect. Experiment with different colors, textures, or even metallic paint to make your DIY ball lights truly one-of-a-kind.
Smart Ball Lights for Modern Homes
Smart ball lights bring technology and style together, making your home lighting experience effortless and personalized. These innovative lights can be controlled through voice assistants like Alexa or Google Home, allowing you to adjust brightness, colors, or schedules with simple commands. Many also connect to mobile apps, giving you full control right from your smartphone. With customizable settings and automation features, smart ball lights let you create the perfect ambiance for any mood or occasion while saving energy in the process.
Eco-Friendly Ball Lighting Choices
Choosing eco-friendly ball lights is a smart way to make your home beautiful while caring for the planet. Solar-powered and rechargeable ball lights reduce energy consumption and work perfectly for both indoor and outdoor settings. Many designs are made from sustainable materials like bamboo, recycled glass, or biodegradable paper, adding a natural and earthy charm to your décor. By opting for energy-efficient LEDs and eco-conscious materials, you not only save on electricity bills but also create a greener, more sustainable home environment.
Ball Lights in Minimalist Interiors
In minimalist interiors, every element matters and ball lights fit perfectly into this clean, uncluttered aesthetic. Their simple yet elegant shape adds a soft, calming glow without overpowering the space. Neutral-colored ball lights, such as white or beige, blend effortlessly with minimalist palettes, creating harmony and warmth. Whether placed in a Scandinavian-style living room or a modern bedroom, these lights bring a sense of tranquility and sophistication, proving that simplicity can be incredibly stylish.
Placement and Hanging Tips
When hanging ball lights, make sure they’re positioned evenly and at the right height to create a balanced look. Keep them about 12–20 inches apart for uniform spacing and hang them roughly 30 inches above tables or surfaces for ideal illumination.
Points:
-
Maintain even spacing between each light.
-
Hang lights at a comfortable height for both aesthetics and function.
-
Use sturdy hooks or mounts for safety and stability.
Maintenance and Care
Proper maintenance ensures your ball lights stay bright and beautiful for years. Regularly dust them with a soft microfiber cloth to prevent dirt buildup, and use a mild cleaner for glass or plastic surfaces. Avoid exposing non-waterproof lights to moisture, as it can damage wiring or reduce lifespan. When not in use, store them in a dry, cool place to preserve their quality and prevent tangling. With a little care, your ball lights will continue to shine brilliantly season after season.
Where to Buy Trendy Ball Lights
Finding the perfect ball lights for your home is easier than ever. You can explore popular online stores like Amazon, Etsy, and Wayfair, which offer a wide variety of designs from minimalist styles to colorful, festive options. For something more unique, visit local lighting or home décor boutiques where you might discover handcrafted or custom-made pieces. Whether you prefer budget-friendly picks or designer lighting, there’s a perfect set of ball lights waiting to brighten your space.
Budget-Friendly Ideas
You don’t need to spend a fortune to make your home glow beautifully. With a little creativity and planning, you can achieve stunning lighting effects on a modest budget.
-
Affordable Yet Stylish Picks: Many online and local stores offer elegant ball lights under $30 that still look high-end and stylish.
-
Upcycling Old Materials: Reuse items like glass jars, paper lanterns, or plastic balls to craft your own unique ball lights eco-friendly and wallet-friendly at the same time.
Conclusion
Ball lights hanging are more than just décor they’re a lifestyle statement. Whether you want a romantic bedroom, a lively party setup, or a serene outdoor escape, these versatile lights can do it all. Their soft, glowing touch brings warmth, style, and personality into every corner of your home.
FAQs About Ball Lights Hanging
1. Can I use ball lights outdoors?
Yes, but ensure they are waterproof and designed for outdoor use.
2. How do I power solar ball lights?
They charge automatically during the day and light up at night using solar energy.
3. Are ball lights energy-efficient?
LED and solar ball lights are highly energy-efficient and eco-friendly.
4. Can I mix different colors and sizes?
Absolutely! Mixing adds depth and visual interest to your space.
5. How long do ball lights typically last?
With proper care, LED ball lights can last up to 25,000 hours or more.